ProLUG Admin Course Unit 5 🐧
Managing Users & Groups
The overarching theme of this Unit is in the title, we are looking at Managing Users & Groups. Managing users and groups in Linux within an enterprise involves creating, modifying, and organizing user accounts and permissions to enforce security and control over resources.
Organizing permissions to enforce security is more important than it has ever been, as we live in a hyper connected world with many bad actors and large amounts of sensitive data.
Linux is fundamentally well suited for Managing Users & Groups because permissions permeate every aspect of a Linux environment. Everything is a file and every file has associated permissions, Therefore we have granular control over the comings and goings of users as administrators.
Lab Work 🧪🥼
Primary Commands / Tools
- alias: Creates a shortcut or alias for a command.
- unalias: Removes an alias that was previously defined.
- awk: A powerful text-processing tool used for pattern scanning and processing.
- useradd: Adds a new user to the system.
- vi .bashrc: Opens the
.bashrcfile in the vi editor to customize shell settings. - UID_MIN 1000: The minimum user ID value for normal users (as defined in
/etc/login.defs). - UID_MAX 60000: The maximum user ID value for normal users (as defined in
/etc/login.defs). - groupadd –g 60001 project: Creates a new group named “project” with a GID of 60001.
- id user4: Displays the user ID (UID), group ID (GID), and group memberships of user “user4.”
etc directories
Looking at etc directories relating to Users, Groups and Associated Security
/etc/passwdcontains essential information about users, including their username, user ID (UID), group ID (GID), home directory, and default shell, with each entry separated by a colon.
/etc/groupstores group information, listing each group’s name, group ID (GID), and its members, with each entry separated by a colon, allowing users to belong to one or more groups for access control purposes.
/etc/shadowcontains encrypted password information and related security details for user accounts, such as password aging and expiration
/etc/gshadowstores encrypted passwords for group accounts, as well as information about group administrators and members, providing enhanced security for group access by restricting who can modify or access specific group data.
/etc/login.defsconfiguration settings for user account creation and login parameters, such as password aging policies, UID and GID ranges, and the default paths for user home directories, helping to control system-wide authentication behavior.
/etc/skel/provides template files that are automatically copied to a new user’s home directory when the user is created, ensuring they have default configuration settings.
Other interesting directories
Brief Description
Associated permissions
/etc/fstabThis file contains information about disk partitions and other block storage devices and how they should be automatically mounted during the boot process.
Permissions: Usually -rw-r–r– (readable by all users, writable only by the root).
/etc/hostnameThis file stores the system’s hostname, which is a unique identifier for the machine in a network.
Permissions: Usually -rw-r–r– (readable by all users, writable only by the root).
/procThis is a virtual filesystem that provides detailed information about processes and system resources. It does not contain actual files but rather system and process information in real-time.
Permissions: dr-xr-xr-x (readable and executable by all users, writable only by root).
/bootContains the kernel, initial ramdisk, and bootloader files needed to start the system.
Permissions: drwxr-xr-x (readable and executable by all users, writable only by root).
/rootThis is the home directory for the root user (the system administrator).
Permissions: drwx—— (only root has read, write, and execute permissions).
/usr/binContains binary executables for user programs.
Permissions: drwxr-xr-x (readable and executable by all users, writable by root).
Mapping unknown infrastructure 🗺️🤔
Objectives:
- Map the Internal ProLUG Network (192.168.200.0/24):
- Map the network from one of the rocky nodes.
- Using a template that you build or find from the internet
- Provide a 1 page summary of what you find in the network.
Approach 🤔
A briefing on the infra. 🔍🖥️
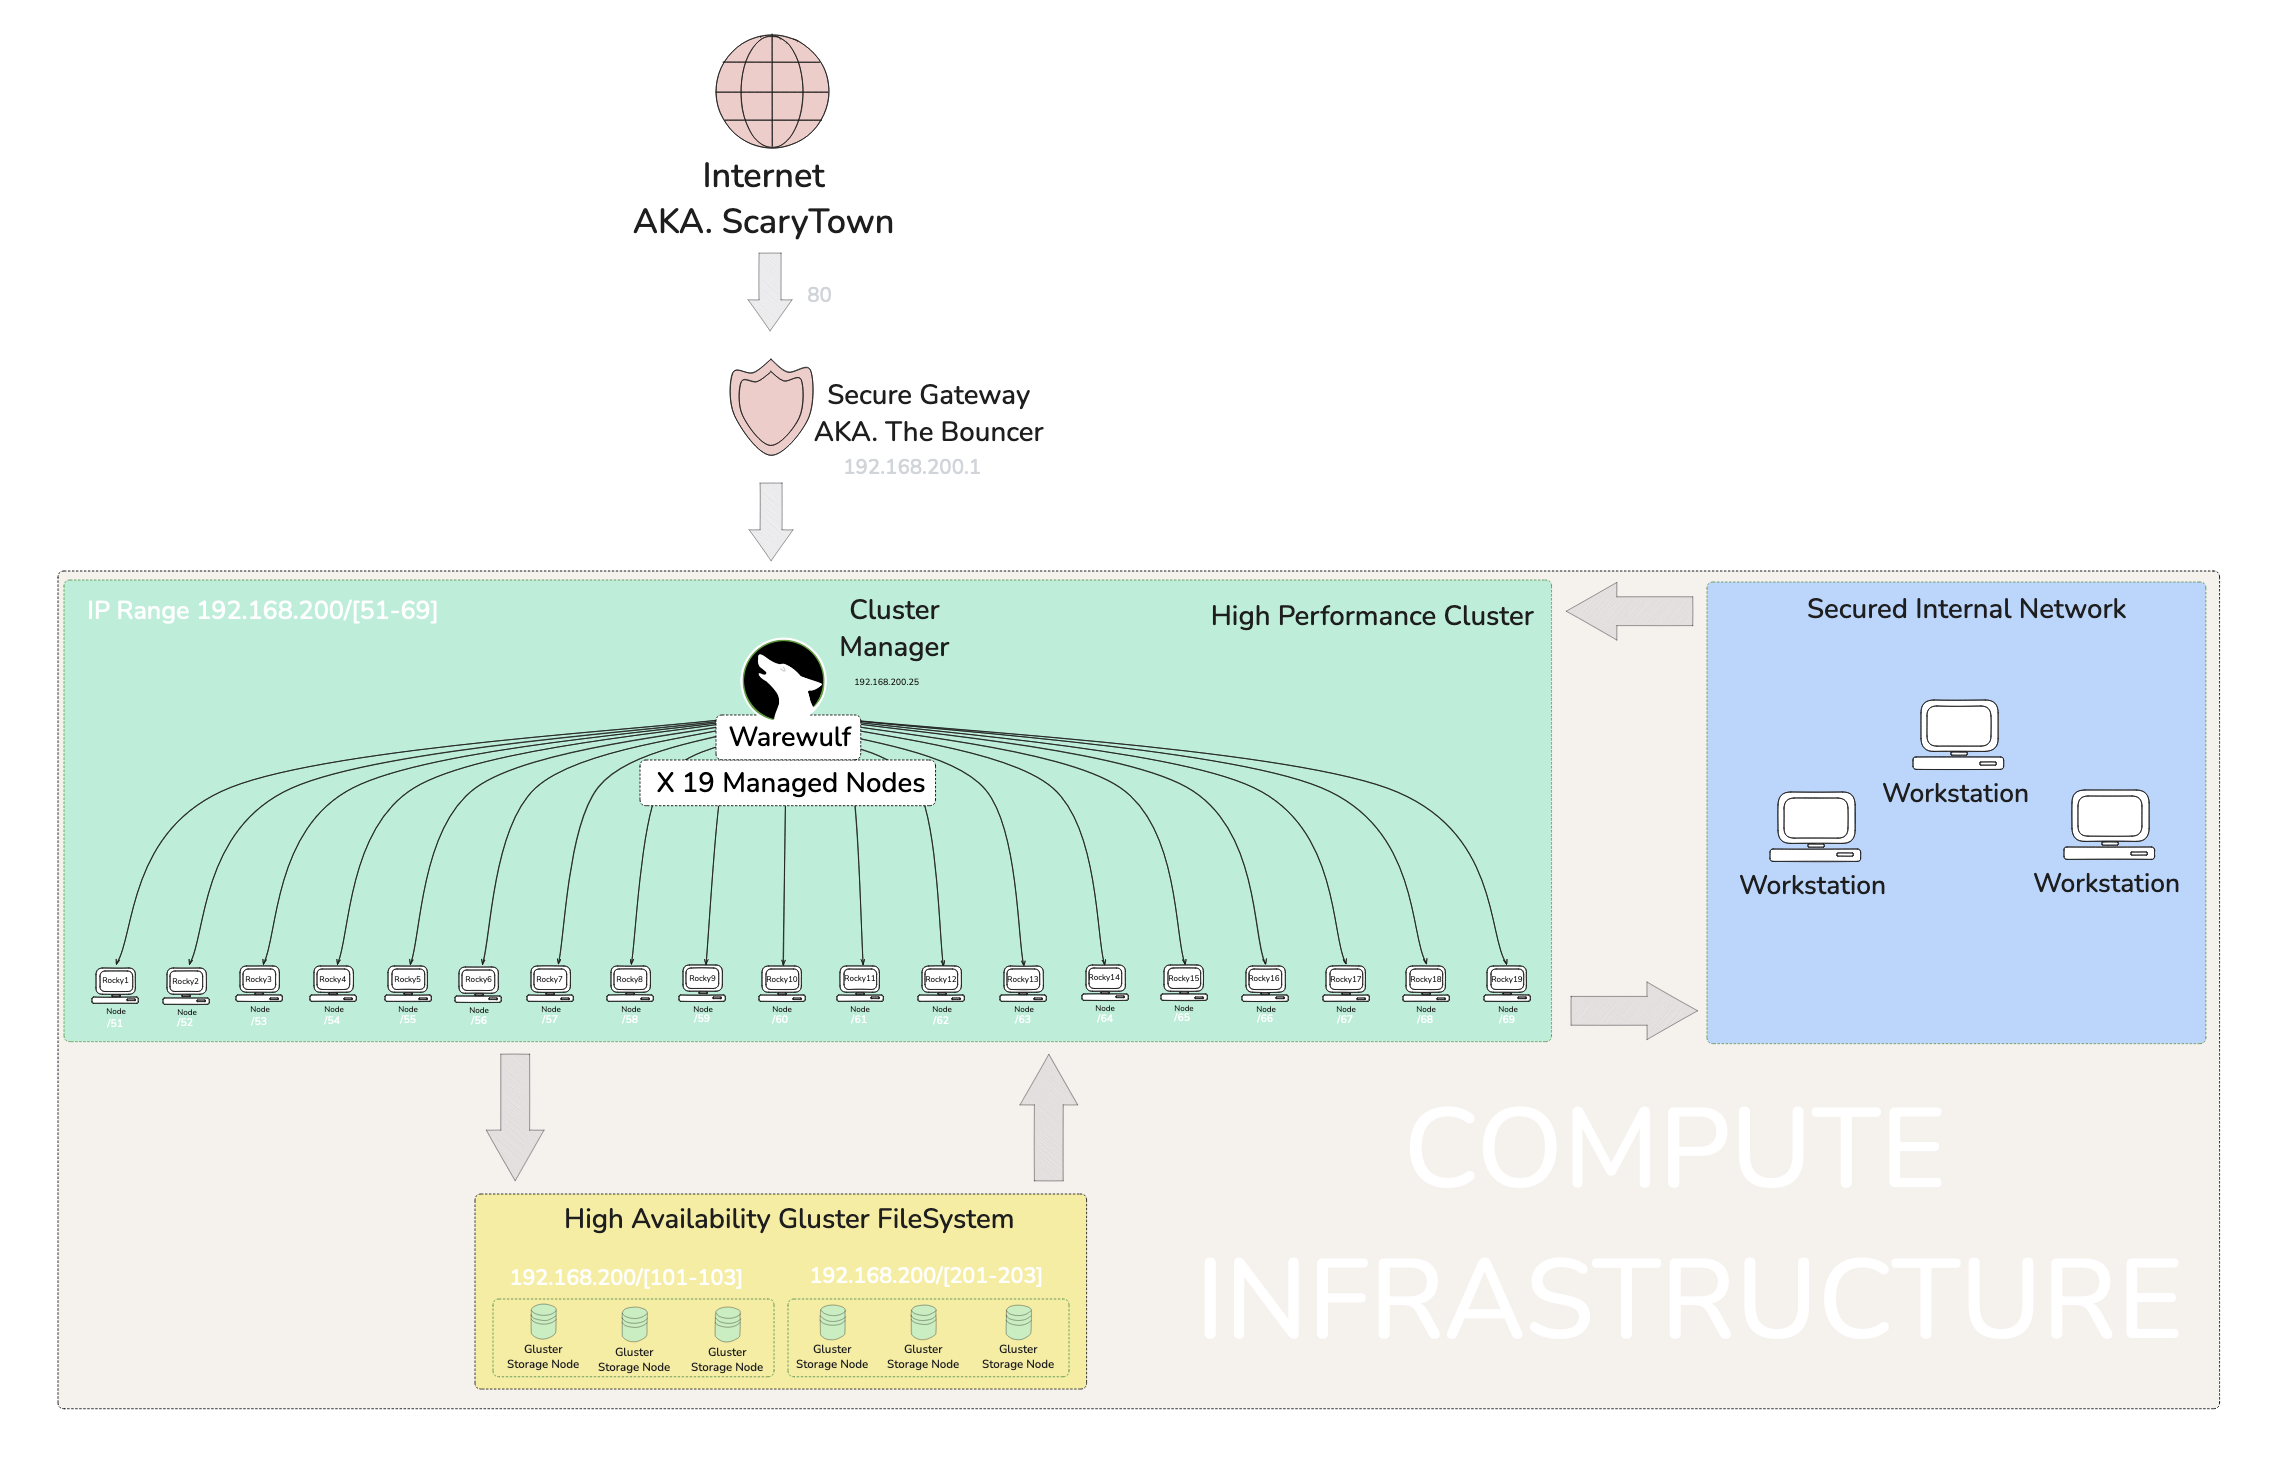
Het’ server is unique to me. He uses an injest system that makes a jump to the actual server for security purposes. Within the main server we have a warewulf managed cluster running a series of Rocky Linux VM’s. ⛰
Since we will be doing this from one of the Rocky Nodes within the system, the jump server will not be an issue I recon. 🤔
Mapping Strategy 📍🗺️
So I shouldn’t just pop into the server and go willy nilly with scanning commands. This sever is managed by someone who understands security. So it is best to do some Dead Reckoning beforehand.
The Basic Commands ⌨️
Mapping the remote servers open ports with nmap. nmap stands for Network Mapper. A quick perusal of the man page states it is an exploration tool and security / port scanner. It was designed to rapidly scan large networks. Nmap uses raw IP packets in novel ways to determine what hosts are available on the network, what services (application name and version) those hosts are offering, what operating systems (and OS versions) they are running, what type of packet filters/firewalls are in use, and dozens of other characteristics.
In order to Map the network I am going to use the ip address for the argument/target of the nmap command.
nmap <server-ip>
Checking mounted filesystem’ with df. stands for Display Free disk space. It is a utility that displays statistics about the amount of free disk space on the specified mounted file system or on the file system of which file is a past.
I will be using the -h flag for human readable format, which ads unit suffixes eg. Gibibyte (GiB) to the ends of values. There is more to it, but I am mentioning the bread and butter of the flag.
df -h
Digging Deeper ⛏️
Getting to know nmap 🫶
nmap is actually a big command, by big I mean the number of options and capabilities are vast. It is quite popular with pen testers and is packaged with Kali Linux – a security analysis and exploitation focused distribution of Linux, so best believe it is something important. This essentially means I should take some time to get to know it more.
Stealth 🥷
Beware that nmap can and will trigger detection software like an active firewall, because nmap is conducting Funny Bizniz by way of packet trickery inside a network, both are technical terms. Luckily there is a stealth option ( -s ) that enables the mapping to take place un-detected –for the most part.
Contrary to what I assumed, the lower case s does not even stand for stealth, though it still helps as a mnemonic. No, it actually stands for SYN and SYN stands for Synchronize. It is part of the TCP three-way handshake, which is a process used to establish a reliable connection between two devices on a network and has nothing to do with guys meeting at a bar.
I thought we were trying to be stealthy, not synchronized 🤔 Well is actually a form of Funny Bizniz wherein SYN is sent and never acknowledged, thustly not completing the handshake process and therefore hiding activity somehow
but how? Well… it reduces the chance of being logged by the target system’s monitoring tools, such as firewalls or intrusion detection systems. Now we both know.
Keep in mind this is only one command option, just imagine how deep the rabbit hole goes.
Important Mapping Command List
Ninjas mark stealthier techniques.
| # | Command | Description |
|---|---|---|
| 1 | nmap -sS <target> 🥷 | TCP SYN scan (stealth mode) |
| 2 | nmap -sT <target> | TCP connect scan (full connection) |
| 3 | nmap -sA <target> | ACK scan to detect firewalls |
| 4 | nmap -sU <target> | UDP scan |
| 5 | nmap -sP <target> | Ping scan to detect live hosts |
| 6 | nmap -sV <target> | Detect service versions on open ports |
| 7 | nmap -O <target> | OS detection |
| 8 | nmap -A <target> | Aggressive scan (OS, version, scripts) |
| 9 | nmap -Pn <target> 🥷 | Disable ping (stealthy, avoid detection) |
| 10 | nmap -p- <target> | Scan all 65,535 TCP ports |
| 11 | nmap --top-ports 100 <target> | Scan the top 100 most common ports |
| 12 | nmap --script <script> <target> | Use Nmap scripts for detailed scanning |
| 13 | nmap -sC <target> | Run default NSE scripts |
| 14 | nmap -sW <target> | TCP window scan |
| 15 | nmap -T4 <target> | Faster scan using timing template T4 |
| 16 | nmap -v <target> | Enable verbose output |
| 17 | nmap -oN scan.txt <target> | Save output in normal format |
| 18 | nmap -oX scan.xml <target> | Save output in XML format |
| 19 | nmap -6 <target> | Scan IPv6 targets |
| 20 | nmap -D RND:10 <target> 🥷 | Decoy scan to mask source of scan |
The Actual Mapping
🚀 Accessing the Secure Jump Point
The network is safely tucked behind a Dynamic Domain Name System (DDNS) running on an Asus Router. This setup allows access from a WAN, in this case, The Internet (if you’ve heard of it 🌐). It securely gate-keeps the network via login credentials, because let’s be honest, the Internet can be a scary place with bots… and sometimes people 👀.
So, what exactly does DDNS do? Well, I’m glad you asked! Most home internet connections don’t offer a static IP address, which makes hosting things tricky because the IP will randomly change. The IP is dynamic for a few reasons, including cost savings and the limited availability of IPv4 addresses. Anyway, I’m getting off track 🛤️. A DDNS monitors this dynamic IP and links it to a stable address that stays fixed.
TL;DR: DDNS bonds a dynamic IP with a fixed address, offering the added bonus of hiding the internal IP from bad actors, or as I like to call them, the baddies in London 🕵️♂️. So, this network has a DDNS gateway in place for that extra layer of security 🔒.
🎯 Jumping into a Node
Once a credentialed fellow enters their login while hanging at the gateway, a list of servers appears, like a digital menu 🍽️. From this list, one can choose where to jump to. In my case, I leapt to Rocky12, a node within a managed cluster. I knew a little about this network thanks to earlier sessions, but most of this can also be discovered by doing some network scanning 🕵️.
🔍 Doing a Broad Inventory Scan
This is where the magic of nmap comes into play! I used two stealthy commands: nmap -sS and nmap -sT. The sT option scanned a wide range of ports and connections, giving me a detailed list that I piped into less for easier viewing 📜.
🎯 Doing Targeted Scans
I grepped all the IP addresses and ran an -sS SYN Scan to gather more details on each node. These scans revealed loads of information about open ports and, in some cases, the hostnames of devices 🎯.
🧩 Identifying Devices
I quickly identified the warewulf orchestration device and all of the Rocky nodes. However, a few mysterious devices needed some detective work 🔎. I noticed glrpc listed as a service while scanning six addresses—three on one IP range and three on another. A quick Google search revealed that glrpc relates to GlusterFS, a filesystem specific to Red Hat systems. After watching a video explainer on GlusterFS, I figured out that these two IP ranges were likely a RAID or high availability configuration 💾.
🗺️ Mapping with Excalidraw
I initially created a highly technical Engineer’s map filled with data and presented it to Het for feedback. He advised me to think about how management would interpret it 🤔. So, back to the drawing board! I focused on improving the visual presentation and labeling, keeping in mind that management doesn’t care about the nitty-gritty; they just need a clear, high-level understanding during briefings 📊.
🎉 Wrapping Up
This concludes my exercise in mapping an unknown network! I learned a lot from this experience and am quite proud of the outcome 💪. It will undoubtedly come in handy when I find myself in future scenarios with many unknowns.
MITRE ATT&CK - 1 🪚
is a globally-accessible knowledge base of adversary tactics and techniques based on real-world observations.
Somewhat unfamiliar terminology for me
- Lateral Movement
Lateral movement in the context of cyber exploitation refers to an attacker’s strategy of moving across a network to gain access to additional systems or sensitive data after initially infiltrating a single point. This involves leveraging compromised credentials, escalating privileges, or exploiting vulnerabilities to navigate between hosts and systems. The objective is often to broaden access within the environment while avoiding detection, eventually targeting critical infrastructure or data.
- Exfiltration 🧳🚀
refers to the unauthorized transfer of data from a target system or network to an external location controlled by an attacker. This can involve methods such as encrypted tunnels, covert channels, or compromised accounts to avoid detection. Exfiltration is typically the final step in a cyberattack, allowing attackers to steal sensitive data, intellectual property, or credentials for further malicious activities.
Security is everybody’s issue
It is important to understand the data on your system regardless of specific responsibility in order to asses risk.
Impact of Exfiltration
The impacts of data exfiltration can be massive. Given the level of severity an exfiltration incident can entirely destroy an organization or cause financial losses, reputational damage, labour force diversion, data loss and jeopardizing future security.
The Linux User Environment
The Linux user environment is a customizable space that includes settings like environment variables, shell configurations, and startup scripts, typically defined in files such as .bashrc or .profile. These configurations allow users to tailor command line behavior, automate tasks, and create a personalized and efficient working environment.
Customizations to the User Environment
Customizations for the user environment in Linux might include setting up aliases for frequently used commands, configuring environment variables, and adding functions to streamline workflows. These changes can make repetitive tasks faster, improve the command line interface’s convenience, and adapt the environment to personal preferences.
Problems may arise
Problems around helping users with their dot files often stem from the diverse and sometimes incompatible changes users make to suit their needs. This can lead to issues like conflicting configurations, inconsistent behavior across systems, or difficult debugging when unexpected behaviors arise from custom scripts.
Definitions/Terminology
Footprinting 👣
Footprinting is an essential phase in ethical hacking and system security. It involves gathering information about a computer system, network, or organization to understand its structure and identify potential vulnerabilities. Footprinting is often the first step of a cyberattack or penetration test, allowing attackers or security professionals to map out an environment before deciding how to approach the next steps.
Scanning 🔍
Scanning is a process of actively probing systems or networks to identify open ports, services, and vulnerabilities. It’s used by attackers to gather deeper insights for potential exploitation and by security professionals to assess weaknesses. Common tools include Nmap and Nessus, while defenses include firewalls and IDS/IPS systems.
Enumeration 💯
Enumeration is the process of extracting more detailed information about a target, such as usernames, network shares, and system services, after identifying open ports and active systems. It typically involves active engagement with the target to gain in-depth knowledge that can be used for exploitation.
System Hacking 🪓
System hacking is the process of gaining unauthorized access to individual systems or networks by exploiting vulnerabilities. It involves activities such as password cracking, privilege escalation, installing backdoors, and covering tracks. Ethical hackers use these techniques to assess system security and recommend protective measures.
Escalation of Privilege 🥉🥈🥇
Privilege escalation is the process of gaining higher-level permissions or privileges than initially granted, allowing an attacker to execute commands with elevated authority. This can be achieved through exploiting vulnerabilities or misconfigurations, leading to unauthorized access to restricted resources or system control.
Rule of least privilege 🔐
The Rule of Least Privilege (LoP) is a security principle that states users, applications, and systems should only be granted the minimum level of access or permissions necessary to perform their tasks. This helps reduce the attack surface, limit potential damage from breaches, and mitigate insider threats.
Covering Tracks 🧹👣
Covering tracks is the process attackers use to hide their unauthorized activities and avoid detection. This involves techniques such as deleting or modifying system logs, using rootkits, and clearing command histories to prevent system administrators or security teams from discovering their presence or actions.
Planting Backdoors 🪴🚪
Planting backdoors involves installing hidden access points in a system, allowing attackers to bypass regular authentication and gain unauthorized access at a later time. Backdoors can be inserted through malicious code, vulnerabilities, or modifications to existing software, making them useful for maintaining persistent control over compromised systems.
ProLUG Links ⛓️
Discord: https://discord.com/invite/m6VPPD9usw Youtube: https://www.youtube.com/@het_tanis8213 Twitch: https://www.twitch.tv/het_tanis ProLUG Book: https://leanpub.com/theprolugbigbookoflabs KillerCoda: https://killercoda.com/het-tanis