Introduction
A personal guide
Systems is a personal reference guide that captures the core principles, practices, and lessons I’ve learned in systems administration and engineering. It reflects both timeless fundamentals and evolving approaches in managing and designing complex infrastructures.
This book is meant to be a practical companion—structured to provide clarity and insight for navigating the challenges of modern systems. With each page, you’ll find ideas, tools, and techniques that have shaped my understanding of how systems work and how to make them work better.
🧙♂️ Sage Wisdom
Operational Commandments 🧑⚖️
- Always ensure ports are open & server is on
- Respect Uptime, But Plan for Downtime
- Rebuild Backups in a Test Environment to ensure integrity
- Write stuff that can be supported by your team
- Document Everything
- Take notes other people can understand
- Does your company have an AI policy?
- Automate Everything
- Never Panic, stay calm
- Don't make blind changes (eg. copypasta)
- Avoid overly complex solutions, KISS
- Make plans for common incidents/accidents/failures
- Always Validate Inputs
Knowledge 🧠
- Always be Learning
- Read the Manpages ! Bonus info pages, tldr
- Centralize important reference documents
- Learn the Command Line like the back of your hand
- Master VIM
- Know a scripting language
- Know a programming language
- Know permissions
- Know how to Monitor and Troubleshoot
- Know your Kernel
- Know your File Systems
- Know version control
- Know SSH in depth
- Know SELinux/Apparmor
- Know Networking
Linux
The Origins of Unix 🛠️
Unix began in 1969 at Bell Labs, created by Ken Thompson, Dennis Ritchie, and others. Its development was inspired by the need for a simpler, more efficient operating system after the failure of the Multics project.
The Rise of C Programming 💻
One of Unix’s revolutionary aspects was its portability, achieved by rewriting it in the C programming language in 1973. This made it easier to adapt Unix to different hardware, laying the groundwork for its widespread adoption.
Unix Philosophy 📜
Unix introduced a design philosophy emphasizing simplicity: do one thing and do it well, build tools that work together, and use plain text for data. These principles remain influential in software development today.
BSD and Open Source 🌐
In the late 1970s, the University of California, Berkeley, developed BSD (Berkeley Software Distribution), an influential Unix variant. BSD popularized features like the TCP/IP stack, which became the backbone of the modern internet.
The Legacy of Unix 🔗
Modern operating systems, including Linux and macOS, owe their foundations to Unix. Its design principles continue to shape software architecture, making Unix a cornerstone of computing history.
Unix a brief history
The Birth of Multics 🌟
Multics (Multiplexed Information and Computing Service) was a groundbreaking project in the 1960s, aimed at creating a multi-user, time-sharing operating system. Though ambitious, it became overly complex and ultimately fell short of its goals.
AT&T Unix Emerges 🛠️
Out of Multics’ failure, AT&T’s Bell Labs engineers—Ken Thompson and Dennis Ritchie—created Unix in 1969. It was designed to be simple, efficient, and flexible, contrasting sharply with Multics’ complexity.
Everything as a File 📂
Unix introduced the revolutionary concept of treating everything—devices, processes, and files—as a file. This abstraction simplified system design and made Unix remarkably versatile and consistent.
The Simple Universal Workspace 🖥️
Unix provided a universal development environment by combining simple tools with powerful capabilities. Tools like grep, awk, and sed allowed users to chain commands together, creating a flexible workspace for solving diverse problems.
The Legacy of Multics and Unix 🔗
While Multics demonstrated the potential of time-sharing systems, Unix perfected the idea through simplicity and modularity. The lessons from both systems laid the foundation for modern computing and inspired generations of operating systems.
Linux History
The Spark of Inspiration: MINIX 💡
In the late 1980s, Andrew Tanenbaum developed MINIX, a Unix-like operating system designed for teaching. While MINIX was free for educational use, its limitations frustrated a young Linus Torvalds, a computer science student at the University of Helsinki.
Linus Torvalds’ Vision 🌱
Torvalds wanted to create a Unix-like system that was free, affordable, and accessible to everyone. Motivated by the exclusivity and high cost of commercial Unix systems, he began writing what would become Linux in 1991.
The First Steps: Linux Kernel 🛠️
Torvalds initially aimed to improve MINIX, but he soon decided to build an entirely new kernel. On August 25, 1991, he announced his project on a MINIX user group, inviting others to contribute to his “just a hobby” operating system.
Open Source Collaboration 🌐
Linux grew rapidly thanks to its open-source nature. Torvalds licensed Linux under the GNU General Public License (GPL), allowing developers worldwide to improve and distribute the software freely.
Linux and the Unix Ecosystem 🔗
Linux provided a Unix-like experience without the cost and licensing restrictions of proprietary systems. By combining the Linux kernel with GNU tools, it became a powerful alternative to expensive Unix systems.
The Legacy of Linux 🚀
Today, Linux powers everything from smartphones to supercomputers. What began as a student’s personal project has evolved into a cornerstone of modern computing, embodying the ideals of collaboration and accessibility.
The Unix Way
Simplicity is Key 🧩
The Unix philosophy emphasizes simplicity: each tool should do one thing and do it well. This design principle encourages small, focused programs that are easy to understand, maintain, and reuse.
Tools That Work Together 🔗
Unix tools are designed to interoperate seamlessly. By chaining commands together using pipes (|), users can combine simple utilities to perform complex tasks without needing monolithic software.
Everything is a File 📂
In Unix, everything—files, devices, and even processes—is treated as a file. This abstraction creates a consistent interface, making it easier to manage and manipulate system components with familiar tools.
Text is Universal 📜
Unix uses plain text for configuration, data storage, and communication between programs. This makes the system transparent, human-readable, and easy to debug or extend using simple text-processing utilities.
Build and Extend 🛠️
The Unix philosophy supports building solutions iteratively. Users can create scripts, combine tools, and extend functionality without altering the underlying system, enabling flexible and scalable workflows.
The Legacy of the Unix Way 🌟
The Unix way has shaped the development of modern operating systems and software practices. Its emphasis on simplicity, composability, and transparency continues to guide engineers and developers worldwide.
Linux is an open-source, Unix-like operating system kernel that serves as the foundation for various operating systems, commonly referred to as “Linux distributions” or “distros.”
🥾 The Boot Process
Simple Boot Steps 🥾
- BIOS/UEFI: Hardware initialization and boot device selection.
- GRUB: Loads the Linux kernel.
- Kernel: Initializes hardware and starts systemd.
- Systemd: Manages services and boot targets.
- File Systems: Root and other filesystems are mounted.
- Services: System services are started.
- Login Prompt: A login prompt (TTY or GUI) is displayed.
Boot Process 🥾
1. BIOS/UEFI Initialization
When the system is powered on, the BIOS (Basic Input/Output System) or UEFI (Unified Extensible Firmware Interface) initializes hardware components (e.g., CPU, memory, storage). The BIOS/UEFI checks for a valid bootable device (e.g., hard drive, USB) and reads the bootloader from the Master Boot Record (MBR) or GUID Partition Table (GPT).
2. Boot Loader (GRUB)
The GRUB (GRand Unified Bootloader) is the default bootloader in RHEL systems.
GRUB is responsible for loading and transferring control to the operating system kernel. It presents a boot menu where users can select the desired kernel or operating system.
It reads the configuration file located at /boot/grub2/grub.cfg and can load additional modules, depending on the system setup.
3. Kernel Initialization
The selected Linux kernel is loaded into memory.
The kernel initializes the system's hardware (via device drivers) and mounts the root filesystem as read-only.
During this stage, initial RAM disk (initrd) or initramfs is used as a temporary root filesystem to prepare the actual root filesystem for mounting.
The kernel starts the first process, systemd (PID 1).
4. Systemd Initialization
Systemd takes over as the init system (the first process), responsible for managing system services and booting the system to a usable state.
It reads unit files (configuration files) from /etc/systemd/system/ and /usr/lib/systemd/system/.
Systemd executes the system's initialization targets, which are similar to run levels in earlier init systems. The default target is usually multi-user.target (equivalent to runlevel 3) or graphical.target (runlevel 5).
5. Mounting File Systems
During the boot process, file systems listed in /etc/fstab are mounted, starting with the root filesystem.
Systemd ensures that all file systems and storage devices are properly mounted and available for use.
6. Starting Services
Systemd starts all the necessary system services (e.g., networking, logging, daemons). Services are controlled through systemd unit files, which specify how and when services should be started.
7. Login Prompt (Get TTY or GUI)
Once the system has reached the target (e.g., multi-user.target or graphical.target), a login prompt is presented to the user.
For multi-user.target (text mode), a getty service starts on virtual terminals, allowing users to log in.
For graphical.target (GUI mode), a display manager (e.g., GDM for GNOME) is started, and a graphical login screen is presented.
Firewalld & UFW 🔥🧱
essential concepts in firewall management using Firewalld and UFW.
A firewall acts as a security system, controlling the flow of traffic between networks by enforcing rules based on zones —logical areas with different security policies. Services are predefined sets of ports or protocols that firewalls allow or block, and zones like DMZ (Demilitarized Zone) provide added security layers by isolating public-facing systems. Stateful packet filtering tracks the state of connections, allowing more dynamic rules, while stateless packet filtering inspects individual packets without connection context. Proxies facilitate indirect network connections for security and privacy, while advanced security measures such as Web Application Firewalls (WAF) and Next-Generation Firewalls (NGFW) offer specialized protection against modern threats.
Types of Firewalls 🔍
Firewalld 🔥🧱
Uses zones to define the level of trust for network connections, making it easy to apply different security settings to various types of connections (like home, public, or work). It’s dynamic, meaning changes can be made without restarting the firewall, ensuring smooth operation.
Zones 🍱
The concept is specific to Firewalld. Zones are a predefined set of firewall rules that determine the level of trust assigned to a network connection. Zones allow you to apply different security policies to different network interfaces based on how much you trust the network.
Common Commands
firewall-cmd --state
Checks if Firewalld is running.
firewall-cmd --get-active-zones
Lists all active zones and the interfaces associated with them.
firewall-cmd --get-default-zone
Displays the default zone for new interfaces or connections.
firewall-cmd --set-default-zone=ZONE
Changes the default zone to the specified zone.
firewall-cmd --zone=ZONE --add-service=SERVICE
Allows a service (e.g., SSH, HTTP) in the specified zone.
firewall-cmd --zone=ZONE --remove-service=SERVICE
Removes a service from the specified zone.
firewall-cmd --zone=ZONE --add-port=PORT/PROTOCOL
Opens a specific port (e.g., 80/tcp) in the specified zone.
firewall-cmd --zone=ZONE --remove-port=PORT/PROTOCOL
Closes a specific port in the specified zone.
firewall-cmd --reload
Reloads the Firewalld configuration without dropping active connections.
firewall-cmd --list-all
Lists all the rules and settings in the active zone.
firewall-cmd --permanent
Applies changes permanently (used with other commands to ensure changes persist after reboots).
firewall-cmd --runtime-to-permanent
Converts the current runtime configuration to a permanent one.
Zone example
- A public zone might have stricter rules, blocking most traffic except for essential services like web browsing.
- A home zone could allow more open traffic, such as file sharing, because the network is more trusted.
UFW 🔥🧱
Uncomplicated Firewall is a user-friendly firewall designed to simplify the process of controlling network traffic by allowing or blocking connections. UFW is commonly used on Ubuntu and provides easy commands for setting up firewall rules, making it ideal for beginners. Despite it is simplicity, it is powerful enough to handle complex configurations.
Default Deny Policy 🔐
- By default, UFW denies all incoming connections while allowing outgoing ones. This enhances security by requiring users to explicitly allow any incoming traffic.
Common Commands
sudo ufw status
Displays the current status of UFW and active rules.
sudo ufw enable
Enables the UFW firewall.
sudo ufw disable
Disables the UFW firewall.
sudo ufw default deny incoming
Sets the default policy to deny all incoming connections.
sudo ufw default allow outgoing
Sets the default policy to allow all outgoing connections.
sudo ufw allow PORT
Allows traffic on a specific port (e.g., sudo ufw allow 22 to allow SSH).
sudo ufw deny PORT
Denies traffic on a specific port.
sudo ufw delete allow PORT
Removes a previously allowed rule for a port.
sudo ufw allow SERVICE
Allows traffic for a service by name (e.g., sudo ufw allow ssh).
sudo ufw deny SERVICE
Denies traffic for a service by name.
sudo ufw allow from IP
Allows traffic from a specific IP address.
sudo ufw deny from IP
Denies traffic from a specific IP address.
sudo ufw allow proto PROTOCOL from IP to any port PORT
Allows traffic for a specific protocol, source IP, and port (e.g., sudo ufw allow proto tcp from 192.168.1.100 to any port 80).
sudo ufw reset
Resets all UFW rules to default.
sudo ufw reload
Reloads UFW rules without disabling the firewall.
WAF 🔥🧱
Web Application Firewall is a security system designed to protect web applications by filtering and monitoring HTTP traffic between a web application and the internet. It helps prevent common web-based attacks like SQL injection, cross-site scripting (XSS), and cross-site request forgery (CSRF) by analyzing the incoming and outgoing traffic and blocking malicious requests. Unlike traditional firewalls that focus on network security, a WAF specifically targets the security of web applications and can be an important part of a layered defense strategy.
More Sophisticated 🍷
are generally more sophisticated than Firewalld or UFW because they operate at the application layer (Layer 7) of the OSI model. Blocking traffic is one thing, but packet inspection is another.
Quite a few ⚖️
There are many Web Application Firewalls out there that cover specific cloud platforms or web services. Here is a list of some popular ones:
- AWS WAF
- Cloudflare WAF
- F5 Advanced WAF
- Imperva WAF
- ModSecurity
- Barracuda WAF
- Sucuri WAF
- Akamai Kona Site Defender
- Fortinet FortiWeb
NGFW 🔥🧱🧠
Next-Generation Firewall is an advanced type of firewall that goes beyond traditional firewall features like packet filtering. It combines standard firewall capabilities with more advanced functionalities such as deep packet inspection (DPI), intrusion prevention systems (IPS), and application-level control. NGWs can inspect and control traffic at a more granular level, allowing administrators to set security rules based on specific applications, users, or behaviors.
Features of a typical NGFW
- Deep Packet Inspection (DPI): Examines the content of data packets, not just their headers, allowing the firewall to identify and block threats hidden in the traffic.
- Intrusion Detection and Prevention System (IDS/IPS): Monitors network traffic for suspicious activity and can take action (like blocking or alerting) to prevent attacks in real-time.
- Application Awareness and Control: Recognizes and manages specific applications (e.g., Facebook, Skype) regardless of port or protocol, allowing for fine-grained traffic control.
- Advanced Malware Protection (AMP): Detects and blocks malware using both signature-based detection and behavioral analysis to prevent malware from entering the network.
- SSL/TLS Decryption: Decrypts encrypted traffic (HTTPS) for inspection to detect threats hiding inside secure channels.
- User Identity Integration: Applies firewall rules based on user identity or group membership rather than just IP addresses, providing more flexible access control.
- Threat Intelligence Feeds: Uses real-time threat data from global databases to protect against emerging threats and malicious IP addresses or domains.
- Cloud-Delivered Security: Provides scalable and flexible cloud-based protection services such as sandboxing, traffic analysis, and updates for zero-day attacks.
- Virtual Private Network (VPN) Support: Allows secure, encrypted connections for remote users or between different networks (site-to-site or remote access VPNs).
- URL Filtering: Controls access to websites based on categories (e.g., social media, gambling) or specific URLs, helping enforce acceptable use policies.
- Quality of Service (QoS): Prioritizes certain types of traffic, ensuring that critical applications receive the necessary bandwidth and reducing congestion.
- Zero-Trust Network Segmentation: Implements policies based on strict access control, ensuring that users and devices only access the resources they are explicitly permitted.
- Sandboxing: Isolates suspicious files or code in a secure environment to detect malicious behavior without affecting the rest of the network.
- Logging and Reporting: Provides detailed logs and reports on network traffic, blocked threats, and firewall activity for auditing and troubleshooting.
NGFW Products
- Palo Alto Networks NGFW
- Cisco Firepower NGFW
- Fortinet FortiGate NGFW
- Check Point NGFW
- Sophos XG NGFW
- Juniper Networks SRX Series NGFW
- Barracuda CloudGen NGFW
- SonicWall NGFW
- WatchGuard Firebox NGFW
- Forcepoint NGFW
- PfSense NGFW
Evaluation of Implementing a Web Application Firewall WAF
1. Introduction
This report has been prepared in response to a request to evaluate the suitability of implementing a Web Application Firewall (WAF) within our infrastructure. The aim of this report is to:
- Compare WAF technology with traditional firewall solutions currently implemented.
- Assess the benefits and limitations of each.
- Provide recommendations based on the findings.
2. Objectives
The key objectives of this evaluation are:
- To determine the suitability of WAF in enhancing our web application security.
- To identify potential risks and benefits associated with the deployment of WAF.
- To compare traditional firewall solutions with WAF in terms of functionality, security, and cost.
- To make recommendations based on the current and future needs of our IT infrastructure.
3. Comparison of Technologies
3.1 Traditional Firewalls (firewalld/ufw)
- Primary Function: Control and filter network traffic based on IP addresses, ports, and protocols.
- Strengths:
- Blocks unwanted connections at the network level.
- Suitable for general network protection.
- Easy to configure and manage.
- Limitations:
- Does not inspect web traffic at the application level.
- Cannot protect against specific web application attacks (e.g., SQL injection, XSS).
3.2 Web Application Firewalls (WAF)
- Primary Function: Protect web applications by filtering and monitoring HTTP/HTTPS traffic.
- Strengths:
- Protects against common web application vulnerabilities (e.g., SQL injection, XSS).
- Monitors web traffic to block malicious requests.
- Can provide real-time threat detection and logging.
- Limitations:
- May require more resources and specialized configuration.
- Focused solely on web applications, not general network traffic.
3.3 Key Differences
| Feature | Traditional Firewall | Web Application Firewall (WAF) |
|---|---|---|
| Layer | Network (Layer 3/4) | Application (Layer 7) |
| Traffic Type | IP, ports, protocols | HTTP/HTTPS, web requests |
| Use Case | General network security | Web application protection |
| Threat Coverage | Blocks IP-based threats | Mitigates web vulnerabilities (SQLi, XSS) |
| Cost | Typically lower | Generally higher due to specialized focus |
4. Key Considerations for WAF Implementation
4.1 Security Benefits
- Enhanced protection against web-specific attacks.
- Ability to monitor and block suspicious activity in real-time.
- Added layer of security on top of traditional network firewalls.
4.2 Cost Analysis
- Initial Investment: The upfront cost of acquiring and configuring a WAF solution.
- Ongoing Costs: Maintenance, updates, and potential personnel training.
4.3 Operational Impact
- May require additional resources for setup, monitoring, and incident response.
- Potential need for collaboration between the security and development teams to ensure smooth integration.
5. Risk Assessment
- Without WAF: Increased vulnerability to web application-specific threats, such as cross-site scripting (XSS) and SQL injection, especially for critical applications.
- With WAF: Increased security for web applications but requires ongoing monitoring and adjustment to ensure performance and efficacy.
6. Recommendations
Based on the evaluation, I recommend the following:
- Implement a WAF: Due to the increasing reliance on web applications and the rise in web-based attacks, implementing a WAF would provide an essential layer of security.
- Maintain Traditional Firewalls: Existing firewalls should continue to be used for network-level protection alongside the WAF.
- Pilot Implementation: Begin with a limited deployment of WAF for high-risk applications to evaluate performance and cost before a full-scale rollout.
- Staff Training: Ensure the security and IT teams are trained in WAF management to maximize its effectiveness.
7. Conclusion
The implementation of a Web Application Firewall is a strategic move to protect our web applications from evolving security threats. While traditional firewalls remain crucial for network security, they cannot defend against the types of attacks WAFs are designed to mitigate. By implementing both WAF and traditional firewall solutions, we can ensure comprehensive security coverage across both network and application layers.
Definitions
- Firewall: A security device that monitors and controls incoming and outgoing network traffic based on predetermined security rules.
- Zone: A defined area within a network that contains systems with similar security requirements, separated by a firewall.
- Service: A specific type of network functionality, like HTTP or DNS, that can be allowed or blocked by a firewall.
- DMZ: A "Demilitarized Zone" is a network segment that serves as a buffer between a secure internal network and untrusted external networks.
- Proxy: A server that acts as an intermediary for requests between clients and servers, often used for filtering, security, or caching.
- Stateful packet filtering: A firewall feature that tracks the state of active connections and makes filtering decisions based on the connection's state.
- Stateless packet filtering: A type of firewall filtering that analyzes each packet independently without considering the state of the connection.
- WAF: A Web Application Firewall that protects web applications by filtering and monitoring HTTP/HTTPS traffic for threats like SQL injection and XSS.
- NGFW: A Next-Generation Firewall that combines traditional firewall functions with additional features like application awareness, integrated intrusion prevention, and advanced threat detection.
🔐 Security Enhanced Linux 🔐
Brief intro to SELinux
SELinux (Security-Enhanced Linux) is a security module integrated into the Linux kernel that enforces mandatory access control policies to provide more granular control over how processes and users interact with files and resources. By defining strict rules on what actions each program or user can perform, SELinux significantly enhances the security posture of a Linux system, helping to prevent unauthorized access and exploits.
Brief intro to Apparmor
AppArmor (Application Armor) is a Linux security module that enforces access control policies based on file paths, limiting what resources applications can access to enhance system security. It provides a simpler, profile-based alternative to SELinux, allowing administrators to create restrictive environments for individual applications without requiring deep changes to system configuration.
Key Terminology
Mandatory Access Control – Discretionary Access Control – Security contexts (SELINUX) – SELINUX operating modes -
Comparing AppArmor and SELinux for Container Separation 1
This article provides a brief comparison between SELinux and AppArmor regarding their effectiveness in securely separating containers.
After reading, it became clear that AppArmor is not an ideal choice for DevSecOps when it comes to securely separating containers. This is due to AppArmor's lack of support for Multi-Category Security (MCS). MCS allows for a hierarchy of controls, granting varying levels of access.
Therefore, if you're looking to securely separate containers without relying on Virtual Machines—which can be costly—SELinux emerges as the better option for such tasks.
Key Takeaways 📝
- AppArmor is not label-based, unlike SELinux.
- AppArmor is generally seen as more user-friendly.
- AppArmor has fewer controls compared to SELinux.
- AppArmor has fewer operations available.
- Both support the Type Enforcement security model (a form of mandatory access control).
- The security model is based on rules where subjects (like processes or users) are allowed to access objects (e.g., files, directories, sockets, etc.).
- AppArmor lacks Multi-Level Security (MLS).
- AppArmor does not support Multi-Category Security (MCS).
- 🔄 Because MCS is unavailable, AppArmor cannot maintain proper separation between containers.
- ⚠️ The default container policy in AppArmor is very loose, which could present security risks.
Quick Comparison Table 🔍
| Technology | Type Enforcement | MLS/MCS | Policy Generator | Generator for Containers |
|---|---|---|---|---|
| AppArmor | Yes | No | Yes | No |
| SELinux | Yes | Yes | No* | Yes |
By understanding these differences, it’s clear that SELinux provides a more secure framework for container separation, making it a crucial tool for modern DevSecOps workflows.
Enabling SELinux
Before enabling SELinux, you can verify its current status by running the sestatus command, which provides the Security Enhanced Status of the system. To activate or configure SELinux, you need to modify the configuration file located at /etc/selinux/config. SELinux can operate in two modes:
- Enforcing: SELinux policies are actively enforced, and violations are blocked.
- Permissive: Policies are not enforced, but violations are logged for review, allowing for troubleshooting without blocking actions.
SELinux Contexts
A context in SELinux is a set of security labels used to manage access to files, processes, and other system resources. The context is composed of several fields:
system_u:object_r:httpd_sys_content_t:s0
user:role:type:level
Breakdown of Context Components:
User: Represents the SELinux identity of a subject (process) or object (file). Role: Groups privileges for processes and users, determining what they are allowed to do. Type: Defines how subjects (processes) can interact with objects (files or resources). Level: Used in Multi-Level Security (MLS) or Multi-Category Security (MCS) systems for additional granularity in access control.
💾 File Permissions
Unix Permissions Cheat Sheet
I created this repository in hopes that it may be used as a helpful reference.
Permissions
Permissions on Unix and other systems like it are split into three classes:
- User
- Group
- Other Files and directories are owned by a user. Files and directories are also assigned to a group. If a user is not the owner, nor a member of the group, then they are classified as other.
Changing permissions
In order to change permissions, we need to first understand the two notations of permissions.
- Symbolic notation
- Octal notation
Symbolic notation
Symbolic notation is what you'd see on the left-hand side if you ran a command like ls -l in a terminal.
The first character in symbolic notation indicates the file type and isn't related to permissions in any way. The remaining characters are in sets of three, each representing a class of permissions.
The first class is the user class. The second class is the group class. The third class is the other class.
Each of the three characters for a class represents the read, write and execute permissions.
rwill be displayed if reading is permittedwwill be displayed if writing is permittedxwill be displayed if execution is permitted-will be displayed in the place ofr,w, andx, if the respective permission is not permitted
Here are some examples of symbolic notation
-rwxr--r--: A regular file whose user class has read/write/execute, group class has only read permissions, other class has only read permissionsdrw-rw-r--: A directory whose user class has read/write permissions, group class has read/write permissions, other class has only read permissionscrwxrw-r--: A character special file whose user has read/write/execute permissions, group class has read/write permissions, other class has only read permissions
Octal notation
Octal (base-8) notation consists of at least 3 digits (sometimes 4, the left-most digit, which represents the setuid bit, the setgid bit, and the sticky bit). Each of the three right-most digits are the sum of its component bits in the binary numeral system. For example:
- The read bit (
rin symbolic notation) adds 4 to its total - The write bit (
win symbolic notation) adds 2 to its total - The execute bit (
xin symbolic notation) adds 1 to its total So what number would you use if you wanted to set a permission to read and write? 4 + 2 = 6.
All together now
Let's use the examples from the symbolic notation section and show how it'd convert to octal notation
| Symbolic notation | Octal notation | Plain English |
|---|---|---|
| -rwxr--r-- | 0744 | user class can read/write/execute; group class can read; other class can read |
| -rw-rw-r-- | 0664 | user class can read/write; group class can read/write; other class can read |
| -rwxrwxr-- | 0774 | user class can read/write/execute; group class can read/write/execute; other class can read |
| ---------- | 0000 | None of the classes have permissions |
| -rwx------ | 0700 | user class can read/write/execute; group class has no permissions; other class has no permissions |
| -rwxrwxrwx | 0777 | All classes can read/write/execute |
| -rw-rw-rw | 0666 | All classes can read/write |
| -r-xr-xr-x | 0555 | All classes can read/execute |
| -r--r--r-- | 0444 | All classes can read |
| --wx-wx-wx | 0333 | All classes can write/execute |
| --w--w--w- | 0222 | All classes can write |
| ---x--x--x | 0111 | All classes can execute |
CHMOD commands
Now that we have a better understanding of permissions and what all of these letters and numbers mean, let's take a look at how we can use the chmod command in our terminal to change permissions to anything we'd like!
| Permission (symbolic nocation) | CHMOD command | Description |
|---|---|---|
| -rwxrwxrwx | chmod 0777 filename; chmod -R 0777 dir | All classes can read/write/execute |
| -rwxr--r-- | chmod 0744 filename; chmod -R 0744 dir | user can read/write/execute; all others can read |
| -rw-r--r-- | chmod 0644 filename; chmod -R 0644 dir | user class can read/write; all others can read |
| -rw-rw-rw- | chmod 0666 filename' chmod -R 0666 dir | All classes can read/write |
💾 The File Hierarchy Standard
Standard File Hierarchy Directories
/
Root Directory: The top-level directory in the file system hierarchy. All other directories are subdirectories of this directory.
/bin - Local Binaries
Essential User Binaries: Contains essential command binaries needed for all users (e.g., ls, cp, mv).
/boot - Startup Files
Boot Loader Files: Contains the files required for the system to boot, including the kernel and initial RAM disk.
/dev
Device Files: Contains special device files for hardware devices (e.g., disks, terminals).
/etc -
Configuration Files: Contains system-wide configuration files and shell scripts that initialize system settings. /etc/networkmanager /etc/networkmanager/system-connections /etc/netplan /etc/hosts
/home
User Home Directories: Contains personal directories for each user (e.g., /home/user1, /home/user2).
/lib
Essential Shared Libraries: Contains essential shared libraries needed by binaries in /bin and /sbin.
/media
Mount Points for Removable Media: Provides mount points for removable media (e.g., CD-ROMs, USB drives).
/mnt
Mount Points for Temporary Mounts: Typically used for temporary mounting of file systems by system administrators.
/opt
Optional Add-on Applications: Contains third-party applications and packages that are not part of the core system.
/proc - Processes
Kernel and Process Information: A virtual filesystem providing information about processes and kernel parameters.
/root
Root User's Home Directory: The home directory for the root user, which is different from /home.
/run
Runtime Data: Contains transient runtime data that is cleared upon reboot (e.g., process IDs, sockets).
/sbin - Shared Binaries
System Binaries: Contains system administration binaries (e.g., shutdown, ifconfig).
/srv
Service Data: Contains data for services provided by the system (e.g., web, FTP).
/sys
Kernel Virtual Filesystem: Provides information and configuration options for the kernel and hardware devices.
/tmp - Temporary Files
Temporary Files: Contains temporary files that are cleared on reboot or periodically.
/usr
User Programs: Contains user utilities and applications (e.g., /usr/bin for user binaries, /usr/lib for libraries).
/var
Variable Data: Contains files that are expected to grow in size, such as logs, mail, and spool files.
Packages
Red Hat Packages
1. RPM Packaging Basics
Red Hat systems use the RPM Package Manager (RPM) to handle software distribution, ensuring consistency, ease of installation, and maintenance.
Key Components of an RPM Package
1. Metadata:
Information about the package (e.g., name, version, release, license).
2. Compiled Binaries:
Executables and libraries required for the software to function.
3. Configuration Files:
Default settings, typically stored in /etc.
4. Scripts:
Pre- and post-install/uninstall scripts for setup and cleanup tasks.
2. The Spec File
The spec file, located in ~/rpmbuild/SPECS, defines how an RPM package is built and what it contains. It is the blueprint of the package.
Key Sections of a Spec File
1. Header
Contains metadata such as package name, version, and license.
2. Build Requirements
Specifies dependencies needed during the build process (e.g., BuildRequires: gcc).
3. Source and Patch Definitions
Points to source tarballs and patch files.
4. Build Instructions
Includes build steps, typically using make or similar tools.
5. File List
Defines the files and directories included in the package.
6. Changelog
Tracks changes made to the package over time.
3. Basic RPM Commands
Managing RPM Packages
Install a Package
sudo rpm -ivh package.rpm
Upgrade a Package
sudo rpm -Uvh package.rpm
Query Installed Packages
rpm -q package-name
Verify a Package
rpm -V package-name
Remove a Package
sudo rpm -e package-name
Building RPM from source
rpmbuild -ba ~/rpmbuild/SPECS/package.spec
4. YUM and DNF Package Managers
YUM and DNF are tools built on top of RPM to handle package management with automatic dependency resolution.
Install a Package
sudo dnf install package-name
Remove a Package
sudo dnf remove package-name
Update all Packages
sudo dnf update
Search for a package
dnf search package-name
List installed Package
dnf list installed
5. Patching RPM Packages
Patching involves modifying a package to fix vulnerabilities, add customizations, or remove branding. It ensures packages meet specific security or functional requirements. Patching Workflow
1. Extract the Source RPM
pmbuild --rebuild package.src.rpm
2. Apply the Patch
Patch1: my-patch.patch
Apply the patch during the build process
%prep
%setup -q
%patch1 -p1
3. Build the Patched Package
rpmbuild -ba ~/rpmbuild/SPECS/package.spec
4. Verify the Package (Check Integrity)
rpm -K package.rpm
6. Golden Images
A golden image is a pre-configured template system image used for deploying systems quickly and consistently.
Golden Image Best Practices
-
Start with a Minimal Base
-
Apply Customizations
-
Include Patches
-
Regular Updates
-
Validation
Debian Packages
1. DEB Packaging Basics
Debian-based systems use the Debian Package Manager (DPKG) to handle software distribution, ensuring consistency, ease of installation, and maintenance.
Key Components of a DEB Package
1. Metadata:
Information about the package (e.g., name, version, architecture, dependencies).
2. Compiled Binaries:
Executables and libraries required for the software to function.
3. Configuration Files:
Default settings, typically stored in /etc.
4. Scripts:
Pre- and post-install/uninstall scripts for setup and cleanup tasks (preinst, postinst, prerm, postrm).
2. The Control File
The control file, located in DEBIAN/control, defines metadata and dependencies for the package. It is a crucial component of a DEB package.
Key Fields of a Control File
1. Package:
Specifies the name of the package.
2. Version:
Defines the version number of the package.
3. Architecture:
Indicates the target architecture (e.g., amd64, i386, all).
4. Description:
Provides a brief and detailed description of the package.
5. Maintainer:
Lists the package maintainer's name and email.
6. Dependencies:
Specifies required packages using Depends, Recommends, or Suggests.
3. Basic DPKG Commands
Managing DEB Packages
Install a Package
sudo dpkg -i package.deb
Remove a Package
sudo dpkg -r package-name
Query Installed Packages
dpkg -l | grep package-name
Verify Package Integrity
debsums -c package-name
Reconfigure a Package
sudo dpkg-reconfigure package-name
4. APT Package Manager
APT (Advanced Package Tool) is a higher-level interface for DPKG, providing dependency resolution and easier package management.
Install a Package
sudo apt install package-name
Remove a Package
sudo apt remove package-name
Update Package Index
sudo apt update
Upgrade All Packages
sudo apt upgrade
Search for a Package
apt search package-name
List Installed Packages
apt list --installed
5. Building DEB Packages
1. Create the Directory Structure
Organize files in the directory structure matching the target filesystem (e.g., /usr/bin, /etc, etc.).
2. Create the Control File
Define metadata in DEBIAN/control.
3. Build the Package
Use dpkg-deb to create the package:
dpkg-deb --build package-directory
4. Verify the Package
Inspect the contents of the package:
dpkg -c package.deb
6. Patching DEB Packages
Patching involves modifying a package to fix vulnerabilities or add customizations.
1. Extract the DEB Package
dpkg-deb -R package.deb extracted-package
2. Apply Changes
Modify files or scripts as needed in the extracted directory.
3. Rebuild the Package
dpkg-deb --build extracted-package
4. Test the Patched Package
Install and verify the functionality:
sudo dpkg -i package.deb
7. Golden Images
A golden image is a pre-configured template system image used for deploying systems quickly and consistently.
Golden Image Best Practices
- Start with a Minimal Base.
- Apply Customizations.
- Include Patches.
- Regular Updates.
- Validation.
Shell
A Linux shell is a command-line interface that allows users to interact with the operating system by executing commands, running scripts, and managing processes. It acts as a bridge between the user and the system’s kernel, providing an interactive layer to control and automate tasks.
Types of Shell Logins in Linux
Linux supports four main types of shell logins based on how users access the system and interact with the shell:
1. Login Shell
- Description: A shell session initiated after logging in through a terminal (e.g., via
tty, SSH, or a graphical login manager). - Key Characteristics:
- Loads configuration files like
/etc/profile,~/.bash_profile,~/.bash_login, or~/.profile. - Used for initializing user environments, setting PATH variables, and running startup scripts.
- Loads configuration files like
- Examples:
- Logging in via SSH.
- Logging in directly via a console (
tty).
2. Interactive Non-Login Shell
- Description: A shell session opened from within an already logged-in environment.
- Key Characteristics:
- Reads user-specific shell configuration files like
~/.bashrc. - Does not process login-specific scripts (
~/.bash_profileor/etc/profile).
- Reads user-specific shell configuration files like
- Examples:
- Opening a terminal emulator from a graphical desktop environment.
- Using the
bashcommand within an existing shell session.
3. Non-Interactive Shell
- Description: A shell session used to execute scripts or commands automatically without direct user interaction.
- Key Characteristics:
- Reads specific files or environment variables required for execution but skips interactive settings.
- Commonly used for scripting and automation tasks.
- Examples:
- Running shell scripts (
bash script.sh). - Cron jobs or remote execution commands.
- Running shell scripts (
4. Restricted Shell
- Description: A restricted version of the shell with limited capabilities to enhance security.
- Key Characteristics:
- Restricts certain commands, such as changing directories, running executables, or setting environment variables.
- Typically used in controlled environments like kiosks or guest user sessions.
- Examples:
- Using
rbash(restricted Bash). - Implementing custom limited-access shells.
- Using
Shell variables
A shell variable is a variable that is used within a shell environment to store data such as strings, numbers, or the output of commands. Shell variables are essential components of shell scripting and interactive shell usage, allowing you to hold and manipulate information while working in a Unix-like system (such as Linux or macOS).
Key characteristics of shell variables:
Local to the shell session: Shell variables exist only within the session in which they are created and are not automatically passed to other processes or subshells unless exported.
Dynamic typing: Shell variables are not explicitly typed, meaning they can store any kind of value (string, integer, etc.) without needing to declare a specific type.
Case-sensitive: Shell variable names are case-sensitive. For example, VAR and var are two distinct variables.
Assigned using =: You assign a value to a shell variable using the = operator, and there should be no spaces between the variable name, the = sign, and the value.
export				    # export a VAR to sub shells and sub processess
printenv  			    # list all variables on bash like $PATH, $HOME, $DISPLAY
unset VAR_NAME			# drop VAR_NAME from bash
env 				    # list all variables on bash like $PATH, $HOME, $DISPLAY
env VAR=value cmd 		# Run cmd with new value of VAR
echo $?                 # returns exit status code of last command
shell I/O
Shell Input/Output (I/O) refers to the way a shell interacts with data streams—taking in input, processing it, and sending output. In Unix-like systems, shell I/O management revolves around three main data streams: standard input (stdin), standard output (stdout), and standard error (stderr). These streams are key to handling how commands receive, process, and return data.
Shell I/O Components:
Standard Input (stdin)
Descriptor: 0
Purpose: Used for receiving input data. By default, stdin reads from the keyboard or terminal input, but it can be redirected to read from files or other input sources.
Standard Output (stdout)
Descriptor: 1
Purpose: Used for sending normal output. By default, stdout sends output to the terminal, but it can be redirected to files or other programs.
Standard Error (stderr)
Descriptor: 2
Purpose: Used for sending error messages. By default, stderr also sends output to the terminal but can be redirected separately from stdout to keep errors and regular output distinct.
cat                 # prints a file to stdout
cat -b              # prints non-blank numbered lines
cut -d <separator> -f <col NO> /etc/passwd
# separate a file with separator and send specified column
echo                # shows a message or variable
less                # show stdout in a nice way, it should be piped after other commands
cmd1 ; cmd2 ; cmd3  # run multiple commands
cmd1 && cmd2        # cmd2 runs if cmd1 is successful
cmd1 || cmd2        # cmd2 runs if cmd1 does NOT run successfully
cmd  > filename     # send output to filename (overwrite)
cmd >> filename     # append output to filename
cmd < filename      # send input data to cmd from filename
wc                  # print newline, word, and byte counts from std input or file (-l, -c, -w)
grep -i             # find something from std input or file (-i for ignore case)
uniq                # report or omit repeated lines
tr                  # translate, squeeze, and/or delete characters from standard input

# Example
# $ sort < temp.txt | uniq -c | sort -nr
#  5 mina
#  3 ali
#  2 sara
#  2 reza
#  2 keyvan
#  1 jafar

sed 's/old/new/'    # it replaces the first old word of each line with new like vim
sed 's/old/new/g'   # it replaces globally
sed -E 's/old/new/' # it supports regex
Shell Commands
# Directories starting with / are called absolute, and those without / are called relative
# A filename in Linux consists of the full path (dirname + basename)
uname -a            # display Linux system info
hostname            # display hostname (it shows IP with the -i switch)
last reboot         # it can show more things like last {reboot, syslog, ...}
whoami              # returns the current logged-in user
basename FILE       # returns the base name of the file
dirname FILE        # returns the directory name of the file
du -ha              # shows disk usage by files in human-readable format
whereis             # shows the binary file of a command
which               # shows where the executable file is located
head                # displays the first lines of a file (default is 10 lines)
tail                # displays the last lines of a file (default is 10 lines)
tail -f             # displays the last lines of a file in live mode (updates with changes)
ls -ltrha           # list all files and folders, time sorted, reversed, human-readable mode
mkdir -p            # make directories with their parent directories
cp -r               # copy folders and their files recursively
stat filename       # view inode details
dd                  # make a byte-by-byte image to a file
time CMD            # calculate time for processing CMD
date                # returns the current date and time
date +"%Y%m%d%H%M"  # returns the date and time formatted
cal                 # shows a calendar
id                  # shows the active user ID with login and group
who                 # shows who is logged on the system
w                   # like who, with more details
users               # lists logged-in users
pwd                 # returns the current directory
touch               # create a file or update the access time of a file
gpg -c FILE         # encrypt a file
gpg FILE.gpg        # decrypt a file
ssh <username>@<host>  -p1234   # connect to a remote host via SSH on port 1234
scp SOURCE_FILE user@host:DEST_FILE  # securely copy a file to a remote host
Networking
Key Networking Concepts
Understanding the roles of various protocols and port ranges is essential for effective networking. Below is an overview of critical concepts:
TCP and UDP Protocols
- Encapsulation: Both TCP and UDP are encapsulated within the IP protocol, enabling communication over networks.
- OSI Layer: Operate at OSI Layer 4 (Transport Layer), managing data delivery between applications.
TCP (Transmission Control Protocol)
- Connection-oriented: Ensures reliable data transfer through acknowledgment and retransmission.
- Flow Control: Manages data flow to prevent overwhelming the receiver.
- Use Cases: Web browsing (HTTP/HTTPS), email (SMTP, IMAP), file transfers (FTP).
UDP (User Datagram Protocol)
- Connectionless: Sends data without establishing a connection, trading reliability for speed.
- No Flow Control: Suitable for time-sensitive transmissions.
- Use Cases: Streaming (audio/video), DNS queries, VoIP.
Port Ranges
-
Non-Ephemeral Ports (0–1023):
- Also known as well-known ports, used for standardized services.
- Examples:
- HTTP (80)
- HTTPS (443)
- FTP (21)
-
Ephemeral Ports (1024–65535):
- Temporary ports assigned dynamically for client-side communication.
ICMP (Internet Control Message Protocol)
- Purpose: Used for network diagnostic and administrative tasks rather than data transfer.
- Functions:
- Ping requests to check host availability.
- Traceroute for path analysis.
The OSI Model
The OSI (Open Systems Interconnection Reference) Model is used as a reference for understanding how network communication occurs. Each layer has specific responsibilities and includes certain technologies or protocols.
Layer 1 - Physical Layer
- Description: Handles the physical connection between devices, including transmission of raw binary data over physical mediums.
- Typical Components:
- Cables (Ethernet, fiber optics, coaxial)
- Connectors (RJ45, RJ11)
- Physical network devices (hubs, repeaters)
- Transmission standards (voltage levels, timing)
Layer 2 - Data Link Layer
- Description: Provides reliable data transfer by addressing and error detection between directly connected nodes.
- Typical Components:
- MAC (Media Access Control) addresses
- Switches
- Ethernet (IEEE 802.3), Wi-Fi (IEEE 802.11)
- Frame structure and error-checking mechanisms (e.g., CRC)
Layer 3 - Network Layer
- Description: Handles logical addressing and routing of data packets across networks.
- Typical Components:
- IP addresses (IPv4, IPv6)
- Routers
- Protocols (e.g., IP, ICMP, ARP)
- Packets and packet forwarding
Layer 4 - Transport Layer
- Description: Ensures end-to-end communication, error recovery, and flow control between devices.
- Typical Components:
- TCP (Transmission Control Protocol) segments
- UDP (User Datagram Protocol) datagrams
- Port numbers
- Flow control, error detection, and retransmission mechanisms
Layer 5 - Session Layer
- Description: Manages and maintains communication sessions between applications.
- Typical Components:
- Session establishment, management, and termination
- Protocols (e.g., NetBIOS, RPC, PPTP)
- Checkpoints for data recovery in case of interruptions
Layer 6 - Presentation Layer
- Description: Translates, formats, and secures data for the application layer.
- Typical Components:
- Data encoding (e.g., ASCII, EBCDIC)
- Data compression (e.g., JPEG, GIF)
- Application encryption and decryption (e.g., SSL/TLS, HTTPS)
Layer 7 - Application Layer
- Description: Provides an interface for end-user applications to communicate over a network.
- Typical Components:
- Web browsers and servers
- Protocols (e.g., HTTP, FTP, SMTP, DNS)
- APIs for network services (e.g., REST, SOAP)
- User-facing applications (e.g., email clients, chat applications)
Routing & Switching
This guide covers essential concepts in routing and switching, including MAC addresses, duplex modes, casting types, and routing protocols.
MAC (Media Access Control)
- Description: The hardware address of a network adapter.
- Characteristics:
- Unique and 6 bytes long.
- Used for communication within a local network.
Duplex Modes
-
Half-Duplex:
- Devices can either send or receive data but not both simultaneously.
- Example: Legacy Ethernet hubs.
-
Full-Duplex:
- Devices can send and receive data simultaneously.
- Example: Modern Ethernet switches.
Collisions and CSMA
- Collision: Occurs when two devices try to communicate simultaneously.
- CSMA/CD (Carrier Sense Multiple Access/Collision Detect):
- Used in half-duplex Ethernet to manage collisions.
- CSMA/CA (Collision Avoidance):
- Prevents collisions; often used in wireless networks where collision detection is impractical.
Switches
- Functions:
- Forwards or drops frames based on MAC address.
- Maintains a MAC address table.
- Ensures a loop-free environment using STP (Spanning Tree Protocol).
- Features:
- Broadcast Frames: Sent to all devices (e.g., ARP requests). Stops at routers.
- ARP (Address Resolution Protocol): Maps IP addresses to MAC addresses.
Casting Types
- Unicast:
- Communication between one sender and one receiver.
- Example: Web surfing, file transfers.
- Broadcast:
- Sends information to all devices in the broadcast domain.
- Limited to IPv4; not used in IPv6.
- Multicast:
- Sends information to a specific group of devices.
- Example: Multimedia delivery.
Protocol Data Unit (PDU)
- Definition: A unit of data for transmission.
- Examples by OSI Layer:
- Ethernet: Frame
- IP: Packet
- TCP: Segment
- UDP: Datagram
Maximum Transmission Unit (MTU)
- Definition: The largest IP packet size that can be sent without fragmentation.
- Impact: Fragmentation slows data transfer.
STP and RSTP
- STP (Spanning Tree Protocol): Prevents loops in a network.
- Port States:
- Blocking: Prevents loops.
- Listening: Cleans the MAC table.
- Learning: Adds MAC addresses to the table.
- Forwarding: Operational state for data transmission.
- Disabled: Port is turned off by admin.
- Port States:
- RSTP (Rapid Spanning Tree Protocol, 802.1w):
- Faster convergence than STP.
- Backwards-compatible.
Additional Networking Features
- Trunking: Connects multiple VLANs over a single link.
- DMZ (Demilitarized Zone): Adds an extra layer of security for sensitive services.
- Port Mirroring: Copies traffic for analysis (e.g., SPAN port).
Routers
- Function: Directs IP packets based on destination IP addresses.
- Routing Types:
- Static Routing:
- Manually configured by admins.
- Secure but lacks automatic rerouting.
- Dynamic Routing:
- Routers exchange routing information.
- Scalable and automatic but requires more resources.
- Default Route:
- Used when no specific route is available.
- Static Routing:
Routing Protocols
- Interior Gateway Protocol (IGP):
- Used within a single AS (Autonomous System).
- Examples: OSPF, RIPv2 (IPv4), OSPFv3, RIPng (IPv6).
- Exterior Gateway Protocol (EGP):
- Routes between multiple AS.
- Example: BGP (Border Gateway Protocol).
- Dynamic Protocol Types:
- Distance-Vector: Uses hop count (e.g., RIPv2, EIGRP).
- Link-State: Considers connectivity and speed (e.g., OSPF).
- Hybrid: Combines features of both (e.g., BGP).
IP Addressing
- IPv4:
- Length: 4 bytes (32 bits).
- Format: Four octets separated by dots.
- IPv6:
- Length: 16 bytes (128 bits).
- Format: Eight groups of hexadecimal values.
- Other Features:
- Dual-stack: Supports both IPv4 and IPv6 simultaneously.
- Tunneling: Allows IPv6 traffic over IPv4 networks.
Quality of Service (QoS)
- Purpose: Manages and prioritizes network traffic.
- Methods:
- CoS (Class of Service).
- DiffServ (Differentiated Services).
Advanced Concepts
- Port Forwarding: Maps external IP/port to internal IP/port; also called static NAT.
- Access Control Lists (ACLs):
- Filters traffic based on rules.
- Often used in firewalls with an implicit deny rule.
- Circuit Switching: Establishes a dedicated connection (e.g., PSTN, ISDN).
- Packet Switching: Data is divided into packets and sent over shared media (e.g., SONET, ATM, DSL).
- Software Defined Networking (SDN):
- Separates control and data planes.
- Centralized and programmable management.
Git
Introduction
Git is a powerful, open-source version control system (VCS) designed to handle projects of all sizes with speed and efficiency. It allows developers to track changes in source code, collaborate on projects, and maintain a history of edits. Git is widely used in software development and is the backbone of many DevOps workflows.
History
- Created by Linus Torvalds: Git was developed in 2005 by Linus Torvalds, the creator of Linux, to manage the Linux kernel's development after a dispute over the BitKeeper version control system.
- Designed for Collaboration: Torvalds emphasized speed, simplicity, and distributed workflows, making Git ideal for large teams working on complex projects.
- Open-Source Success: Over time, Git has become the standard for version control, widely adopted by developers and organizations globally.
Linus Torvalds and the Canoeing Analogy
Linus Torvalds often described Git and its terminology using the analogy of canoeing. He compared version control to managing multiple canoes traveling down a river:
-
Branches:
- Represent canoes navigating their own paths (branches) in the river.
- Each canoe is independent but can eventually rejoin (merge) the main flow of the river.
-
Merging:
- Merging branches is akin to two canoes meeting and combining their progress into a single route.
-
Commits:
- Each paddle stroke represents a commit—individual contributions that propel the canoe forward.
-
Rebase:
- Rebase is like picking up your canoe and moving it to a different part of the river to follow another route, aligning with the main current.
This analogy simplifies understanding Git's workflows and highlights its purpose: to enable teams to collaborate seamlessly without losing individual progress or diverging too far from the main goal.
Importance of Git
- Distributed Version Control: Every user has a complete copy of the repository, ensuring redundancy and enabling offline work.
- Branching and Merging: Git makes it easy to experiment with changes using branches, which can be merged into the main project once tested.
- Collaboration: Teams can work on the same codebase simultaneously without overwriting each other's work.
- History Tracking: Every change is logged, allowing developers to understand who made changes, what was changed, and when.
- Integration: Git integrates with platforms like GitHub, GitLab, and Bitbucket for enhanced collaboration and project management.
Usage
Git is primarily used for:
- Version Control: Track changes in code over time.
- Collaboration: Enable teams to work together on the same codebase.
- Backup and Restore: Protect work with a distributed repository.
- Experimentation: Safely test new features using branches.
Common Git CLI Commands
Configuration
git config --global user.name "Your Name"
Set your username globally.git config --global user.email "your.email@example.com"
Set your email globally.git config --global core.editor "nano"
Set the default text editor.
Repository Initialization
git init
Initialize a new Git repository in the current directory.git clone <repository-url>
Clone an existing repository.
Working with Files
git add <file>
Stage changes for the next commit.git add .
Stage all changes in the current directory.
Committing Changes
git commit -m "Commit message"
Commit staged changes with a message.git commit -a -m "Commit message"
Stage and commit changes in one step.
Branching
git branch
List all branches.git branch <branch-name>
Create a new branch.git checkout <branch-name>
Switch to a branch.git checkout -b <branch-name>
Create and switch to a new branch.
Merging
git merge <branch-name>
Merge the specified branch into the current branch.
Viewing History
git log
View commit history.git log --oneline
View a condensed commit history.
Remote Repositories
git remote add origin <repository-url>
Add a remote repository.git push -u origin main
Push changes to the remote repository's main branch.git pull origin main
Pull the latest changes from the remote repository.
Undoing Changes
git reset <file>
Unstage a file.git checkout -- <file>
Discard changes to a file.
Generating an Ed25519 SSH Key for GitHub
Step 1: Generate the SSH Key
ssh-keygen -t ed25519 -C "your.email@example.com"
Step 2: Check SSH Key Agent Status
eval "$(ssh-agent -s)"
Step 3: Add SSH Key to Agent
ssh-add ~/.ssh/id_ed25519
Step 4: Copy SSH Key to clipboard
cat ~/.ssh/id_ed25519.pub | xclip
- Copy and paste into github ssh settings.
Example Pubkey
ssh-ed25519 AAAAC3NzaC1lZDI1NTE5AAAAIBnX2RcH3jFrJv0G7G7Q0n3kF1HQoYF1tHkK9jEMj8ez example@example.comVIM
Intro
Vim is a powerful and highly configurable text editor that is popular among developers, system administrators, and anyone who works extensively with text. Renowned for its efficiency, Vim allows users to perform complex editing tasks with minimal keystrokes, making it an essential tool for productivity once mastered. Though its interface may seem intimidating at first, Vim’s modal editing system—where different modes like insert, command, and visual are used for specific tasks—provides unparalleled control over text manipulation. Whether you’re editing code, writing documentation, or simply taking notes, Vim is designed to adapt to your needs and help you work faster. While the learning curve may be steep, Vim’s rewards are well worth the effort.
History
ed
ed is one of the earliest text editors, developed by Ken Thompson in 1971 as part of the original UNIX operating system. It is a line editor, meaning users edit text line-by-line, which was practical for the teletype terminals of the time. Despite its simplicity, ed introduced concepts like regular expressions and became the foundation for many subsequent editors.
Key Features 🔑
Operates in a command-line interface.
Supports regular expressions for search and replace.
Basis for ex, the precursor to vi.
Learn more: ed (Wikipedia)
vi
vi, short for visual editor, was developed by Bill Joy in 1976 for the Berkeley Software Distribution (BSD) of UNIX. It expanded on ex by introducing a visual mode, allowing users to see the text being edited in real-time. vi quickly became the default text editor in many UNIX systems due to its powerful modal editing capabilities.
Key Features 🔑
Modal editing: command mode, insert mode, and visual mode. Highly efficient for keyboard-based navigation and text manipulation. Portable and lightweight, available on nearly every UNIX-based system. Learn more: vi (Wikipedia)
vim
vim (Vi IMproved) was created by Bram Moolenaar in 1991 as an extended version of vi. Written for the Amiga computer, vim was designed to provide more features while maintaining compatibility with vi. Over time, vim became the de facto standard for advanced text editing, with extensive customization options and support for plugins.
Key Features 🔑
Syntax highlighting, multiple buffers, and tabbed editing. Extensible through plugins and scripting (via Vimscript). Cross-platform and widely adopted for programming and system administration. Learn more: vim (Wikipedia)
neovim
neovim is a modern fork of vim, launched in 2014 by Thiago de Arruda. It aims to refactor vim's codebase to improve maintainability and enable new features. neovim introduces modern integration, asynchronous processing, and an enhanced user experience, making it particularly appealing for developers.
Key Features 🔑
Built-in support for asynchronous plugins and language servers (LSP). Improved user interface capabilities (e.g., external GUI frontends). Configuration through Lua in addition to Vimscript. Focus on extensibility and community-driven development. Learn more: neovim (Wikipedia)
Timeline Summary
- 1971:
edintroduced as the original UNIX editor. - 1976:
viadds a visual mode toedandex. - 1991:
vimimproves onviwith modern features. - 2014:
neovimmodernizesvimfor enhanced extensibility and performance.
Resources
OpenVim: An interactive tutorial that teaches how to use Vim with a context-aware help menu. OpenVim
Vim Genius: A flashcard-styled game designed to enhance your Vim-writing skills by increasing speed and strengthening muscle memory. Vim Genius
Vim Hero: An interactive platform that teaches you how to edit code using Vim with examples, challenges, and games. Vim Hero
Vim Tutor: A built-in tutorial that comes with Vim, providing a hands-on introduction to its features. Access it by typing vimtutor in your terminal.
VIM Commands
Basics
# by default in command mode
# i		insert mode
# v		visual mode
# a		append mode (insert after curser)
# A		append mode at end of line (shift + a)
# o		open new blank line below curser and switch to insert mode
# O 		open new blank line above curser and switch to insert mode (shift + o)
# :q! 		quite without save
# :wq		save and exit
# :x		save and exit
# ZZ		save and exit (shift + z + z)
# :w		save
# :wq FILE_NAME	saves as new file
# ctrl + g	print current file status and curser location
# :f            print current file status and curser location
# :! CMD	execute externam terminal command CMD
# :r FILENAME	retrieves disk file FILENAME and puts it below the cursor position
# :r !CMD	reads the output of the command and puts it below the cursor position
# :syntax off	turn off syntax highlighting
# :set nu 	show line numbers (:set nonu to hide line numbers)
Movement
# Typing a number before a motion repeats it that many times example: 2w, 3e,
# h,j,k,l	to move curser by char
# w,b,e 	to move curser by word
# %         jump to matching (,{,[ or ],},)
# (also can use W,B,E which jump only on spaces, not _ , - )
# :LINE_NO 	jumps to line number
# 0 		jumps at start of of line = home
# $		jumps to end of line = end
# G		jump to last line (shift + g)
# gg		jump to first line
# ctrl + f	page down
# ctrl + b 	page up
delete text
# x		        delete char under curser like Delete key
# X		        delete char before curser like back space (shift + x)
# dw		    delete word from curser until next word
# de		    delete word from curser until last char of current word
# D		        white the line from curser to end of line (shift + d)
# dd		    delete current line
# Number + dd 	delete some lines from current line to down count number
# dG 		    deletes entire lines below (d + shift+g)
Replace text
# r + New_char	replace current char with new_char
# cw		delete current word and go to insert mode
# R 		switch to replace mode (shft + r), replace inserted char until esc
History
# u		undo one step (:undo)
# U		undo total chages of current line (shift + u)
# ctrl + r	redo one step (:redo)
Copy, paste
# yy 		copy current line
# yw		copy one word,
# Number + yw	copy Number of words (also can press y+Number+w)
# Number + yy	copy number of lines below curent curser
# p 		paste after current line
# P 		paste befor current line (shift + p)
Visual Mode
# all movement keys also work in this mode
# v		switch to visual mode
# y 		copy selected text
# d		copy and delete selected text (cut)
# :w		after selecting press :w FILENAME to save selected part as new FILENAME
Search & Replace
# /WORD			search forward
# ?WORD			search backward
# / + enter		jump to next word found (also can press n)
# ? + enter		jump to previous found  (also can press N)
# :s/old/new/g		to substitute 'new' for 'old' in current line (delete g to apply for first word found)
# :#,#s/old/new/g	#,# are the range of lines where the substitution is to be done.
# :%s/old/new/g		to change every occurrence in the whole file.
# :%s/old/new/gc	to find every occurrence in the whole file, with a prompt to substitute or not
# :set xxx		sets the option "xxx".  Some options are:
#	'ic' 'ignorecase'	ignore upper/lower case when searching
#	'is' 'incsearch'	show partial matches for a search phrase
#	'hls' 'hlsearch'	highlight all matching phrases
#	'no+xxx'		disables xxx option
VIM Config File
VIM is configured using an 'RC' file called '.vimrc'
My Config
" vim-plug plugin manager settings
call plug#begin('~/.vim/plugged')

" Go related plugins
Plug 'fatih/vim-go'       " A Go development plugin for Vim
Plug 'junegunn/fzf.vim'   " Fuzzy finder plugin (optional but useful)
Plug 'preservim/nerdtree' " File explorer (optional)

" Multi-language support and autoformatting
Plug 'sbdchd/neoformat'      " Autoformatter for multiple languages
Plug 'sheerun/vim-polyglot'  " Syntax highlighting for many languages

" Git integration
Plug 'tpope/vim-fugitive'    " Git commands within Vim

call plug#end()

" Enable vim-go features
let g:go_fmt_command = "gopls"  " Use gopls for formatting
let g:go_auto_type_info = 1     " Show Go type info on hover
let g:go_highlight_fields = 1   " Highlight struct fields

" NERDTree configuration
nnoremap <C-n> :NERDTreeToggle<CR>  " Toggle NERDTree with Ctrl-n

" Enable line numbers
set number

" Highlight the current line
set cursorline

" Enable syntax highlighting
syntax on

" Set color scheme (choose your favorite or install custom themes)
colorscheme desert

" Use spaces instead of tabs
set expandtab

" Set the number of spaces per tab
set tabstop=4

" Set the number of spaces used for auto-indenting
set shiftwidth=4

" Enable smart indentation
set smartindent

" Enable auto-indentation
set autoindent

" Highlight matching parentheses
set showmatch

" Enable line wrapping
set wrap

" Display line wrap characters
set list
set listchars=tab:»·,trail:·,extends:>,precedes:<

" Enable mouse support
set mouse=a

" Show the status line
set laststatus=2

" Enable line numbers relative to the cursor
set relativenumber

" Highlight search results
set hlsearch

" Incremental search
set incsearch

" Ignore case in search patterns
set ignorecase
set smartcase

" Enable persistent undo
set undofile
set undodir=~/.vim/undodir

" Enable clipboard integration
set clipboard=unnamedplus

" Set a better command line height for displaying messages
set cmdheight=2

" Show line and column numbers in the status line
set ruler

" Enable filetype plugins and indentation
filetype plugin indent on

" Automatically reload files changed outside of Vim
set autoread

" Disable audible bell
set noerrorbells
set visualbell

" Prevent accidental closing of unsaved files
set confirm

" Better scrolling experience
set scrolloff=8
set sidescrolloff=8

" Automatically save and source this file after editing
autocmd BufWritePost ~/.vimrc source ~/.vimrc

" Neoformat configuration for autoformatting
let g:neoformat_enabled_rust = ['rustfmt']
let g:neoformat_enabled_python = ['black']
let g:neoformat_enabled_go = ['gofmt']
let g:neoformat_enabled_php = ['php-cs-fixer']
let g:neoformat_enabled_sql = ['sqlformat']
let g:neoformat_enabled_html = ['tidy']
let g:neoformat_enabled_css = ['tidy']
let g:neoformat_enabled_tailwind = ['prettier']
let g:neoformat_enabled_c = ['clang-format']
let g:neoformat_enabled_cpp = ['clang-format']
let g:neoformat_enabled_yaml = ['yamlfmt']
let g:neoformat_enabled_toml = ['taplo']
let g:neoformat_enabled_xml = ['xmllint']
let g:neoformat_enabled_ansible = ['ansible-lint']
let g:neoformat_enabled_terraform = ['terraform']
let g:neoformat_enabled_markdown = ['mdformat']
let g:neoformat_enabled_ini = ['configparser']

" Autoformat on save
autocmd BufWritePre *.rs,*.py,*.go,*.php,*.sql,*.html,*.css,*.c,*.cpp,*.yaml,*.toml,*.xml,*.yml,*.tf,*.md,*.ini Neoformat
This is a demonstration of the compilation process.
Neovim: A Modern Take on Vim
Neovim is a highly configurable, modern text editor built as a fork of the venerable Vim editor. It retains the core philosophy of Vim—minimalism, efficiency, and keyboard-driven workflows—while introducing significant architectural improvements to address limitations of its predecessor.
Key Features of Neovim
-
Streamlined Codebase:
- Neovim was designed to reduce technical debt by refactoring and simplifying Vim's legacy codebase.
- It has a smaller, more maintainable core compared to Vim, making it easier to extend and adapt to modern workflows.
-
Lua Scripting:
- Neovim replaces Vimscript with Lua as its primary configuration and scripting language.
- Lua is faster, more modern, and allows users to write cleaner, modular configurations.
- Backward compatibility with Vimscript is retained, enabling users to migrate seamlessly.
-
Extensibility:
- Neovim provides a robust plugin architecture powered by Lua and its built-in API.
- It supports asynchronous job control, enabling plugins to execute tasks without blocking the editor.
-
Built for IDE-like Functionality:
- Neovim integrates well with tools like LSP (Language Server Protocol), offering rich features like code completion, linting, and go-to-definition.
- The Tree-sitter library provides advanced syntax highlighting and code parsing for various programming languages.
- Neovim's ecosystem includes plugins like Telescope for fuzzy finding and nvim-cmp for powerful auto-completion.
Why Neovim is Favored as an IDE
- Performance: Lua scripting and asynchronous operations make Neovim faster and more responsive, especially when handling large projects.
- Customization: Its Lua-based configuration gives developers granular control over their environment, enabling them to craft a workflow that fits their needs perfectly.
- Modern Features: Neovim offers out-of-the-box support for features like LSP, syntax trees, and terminal emulation, bridging the gap between text editor and full-fledged IDE.
- Community and Ecosystem: Neovim's active community regularly produces high-quality plugins and tools tailored to modern development needs.
Neovim vs. Vim
| Feature | Vim | Neovim |
|---|---|---|
| Codebase | Larger, older, harder to extend | Refactored, modular, and lean |
| Scripting | Vimscript | Lua (faster, modern, cleaner) |
| Extensibility | Limited asynchronous support | Full async API, modern plugins |
| Default Features | Limited IDE functionality | Built-in LSP, Tree-sitter, more |
| Community Focus | Traditional workflows | Modern developer needs |
Neovim has become a go-to choice for developers looking for a lightweight yet powerful editor with IDE-like capabilities. It strikes a balance between simplicity and advanced functionality, making it a favorite among modern programmers.
Basic LUA Config (No Plug-ins, No LSP)
-- init.lua (Minimal Config)

-- General Settings
vim.opt.number = true             -- Show line numbers
vim.opt.relativenumber = true     -- Show relative line numbers
vim.opt.tabstop = 4               -- Number of spaces for a tab
vim.opt.shiftwidth = 4            -- Number of spaces for auto-indent
vim.opt.expandtab = true          -- Convert tabs to spaces
vim.opt.smartindent = true        -- Enable smart indentation
vim.opt.wrap = false              -- Disable line wrapping
vim.opt.cursorline = true         -- Highlight the current line
vim.opt.termguicolors = true      -- Enable 24-bit RGB colors
vim.opt.scrolloff = 8             -- Keep 8 lines visible when scrolling
vim.opt.signcolumn = "yes"        -- Always show sign column
vim.opt.ignorecase = true         -- Ignore case when searching
vim.opt.smartcase = true          -- Override ignorecase if search contains capitals
vim.opt.backup = false            -- Disable backup files
vim.opt.swapfile = false          -- Disable swap files
vim.opt.undofile = true           -- Enable persistent undo
vim.opt.updatetime = 300          -- Faster updates for responsiveness

-- Leader Key
vim.g.mapleader = " "             -- Set leader key to space

-- Key Mappings
local map = vim.api.nvim_set_keymap
local opts = { noremap = true, silent = true }

-- Basic Keybindings
map("n", "<leader>w", ":w<CR>", opts)       -- Save file
map("n", "<leader>q", ":q<CR>", opts)       -- Quit Neovim
map("n", "<leader>h", ":nohlsearch<CR>", opts) -- Clear search highlights
map("i", "jk", "<Esc>", opts)               -- Exit insert mode with 'jk'

-- Basic Autocommands
vim.cmd [[
  augroup basic_settings
    autocmd!
    autocmd BufWritePre * %s/\s\+$//e       " Remove trailing whitespace on save
    autocmd FileType python setlocal tabstop=4 shiftwidth=4 expandtab
  augroup END
]]

-- Minimal Statusline
vim.opt.statusline = "%f %y %m %= %l:%c [%p%%]"

print("Minimal Neovim config loaded!")
1. ext4 💾 (Linux, BSD)
Intro
ext4 (Extended File System version 4) is the default file system for many Linux distributions.
Links
https://en.wikipedia.org/wiki/Ext4 https://docs.redhat.com/en/documentation/red_hat_enterprise_linux/6/html/storage_administration_guide/ch-ext4#ch-ext4
Technical Features: 🔍
- Journaling
- Extent-Based Allocation
- Delayed Allocation
- Persistent Pre-allocation
- Multi-block Allocation
- Online Resizing
- 64-bit File System Support
- Directory Indexing with HTree
- Defragmentation
- Backward Compatibility with ext2/ext3
- Barriers for Data Integrity
- Large File Support (up to 16 TiB)
- Metadata Checksumming (optional)
- Quotas
Advantages 👍
- Mature and Stable: ext4 is a well-tested and widely-used file system with a long history of stability.
- Performance: It offers good performance for most workloads, especially for general-purpose usage.
- Backward Compatibility: Supports ext3 and ext2 file systems, making it easy to upgrade.
- Journaling: Provides a journaling feature that helps to prevent data corruption in case of a crash.
- Wide Support: Supported by almost all Linux distributions and has a large community.
Downsides 👎
- Limited Scalability: While adequate for most users, ext4 doesn't scale as well as newer file systems for very large volumes and large numbers of files.
- Lack of Advanced Features: ext4 lacks features like snapshotting and built-in data integrity checks (e.g., checksums).
Scale
- Maximum File Size: 16 TiB
- Maximum Volume Size: 1 EiB
Distro Usage
- ext4 is the most widely used format spanning Linux and BSD.
2. XFS 💾 (Linux, BSD)
Intro
XFS is a high-performance file system designed for parallel I/O operations, often used in enterprise environments.
Links
https://en.wikipedia.org/wiki/XFS https://docs.redhat.com/en/documentation/red_hat_enterprise_linux/7/html/storage_administration_guide/ch-xfs
Technical Features: 🔍
- Extent-Based Allocation
- Journaling (Metadata Journaling)
- Delayed Allocation
- Persistent Pre-allocation
- Online Resizing (grow only)
- Dynamic Inode Allocation
- B+ Tree Directory Structure - (Quick Access B Tree)
- Direct I/O Support
- Data Striping for Performance
- Advanced Metadata Management
- Large File and Volume Support (up to 8 EiB)
- Online Defragmentation
- Quotas and Project Quotas
- Realtime Subvolume for Real-Time I/O
Advantages 👍
- High Performance: Optimized for large files and supports high-performance parallel I/O, making it ideal for environments with large data sets.
- Scalability: Scales well with large volumes and large numbers of files, supporting file systems up to 500 TB.
- Journaling: Uses journaling to help prevent data corruption.
- Online Resizing: Supports online resizing of file systems (only grow).
Downsides 👎
- Complexity: XFS is more complex to manage compared to ext4.
- Limited Snapshot Support: Has limited support for snapshots compared to Btrfs and OpenZFS.
- Potential Data Loss on Power Failure: In certain configurations, XFS may be more susceptible to data loss in the event of a sudden power loss.
Technical Details 🔍
- Maximum File Size: 8 EiB
- Maximum Volume Size: 8 EiB
Distro Usage
XFS has been in the Linux Kernel since 2001 It is the default file system for RHEL
3. Btrfs 💾 (Linux)
Intro
Btrfs (B-tree File System) is a modern, copy-on-write file system designed for Linux that offers advanced features like snapshots, RAID support, self-healing, and efficient storage management, making it suitable for scalable and reliable data storage.
Links
https://en.wikipedia.org/wiki/Btrfs https://docs.redhat.com/en/documentation/red_hat_enterprise_linux/6/html/storage_administration_guide/ch-btrfs https://docs.kernel.org/filesystems/btrfs.html
Technical Features: 🔍
- Journaling
- Extent Base Allocation
- Persistent Pre-allocation
- Delayed Allocation
- Multi-block Allocation
- Stripe-aware Allocation
- Resizeable with resize2fs
- *B-tree Balancing Algorithm - Different from XFS (COW B Tee)
- Copy-on-Write (COW)
- Snapshots and Clones
- Built-in RAID Support
- Data and Metadata Checksumming
- Self-Healing
- Dynamic Subvolumes
- Online Resizing
- Compression (LZO. ZLIB. ZSTD)
- Deduplication
Advantages 👍
- Snapshot Support: Provides built-in support for snapshots, allowing for quick backups and rollbacks.
- Data Integrity: Includes checksumming of data and metadata, which helps to ensure data integrity.
- Self-Healing: With RAID support, Btrfs can automatically repair corrupted data.
- Dynamic Storage: Allows for the dynamic addition and removal of storage devices.
Downsides 👎
- Stability: Btrfs is considered less mature than ext4 or XFS, particularly for certain features like RAID 5/6.
- Performance: May not perform as well as XFS or ext4 in certain high-performance scenarios, particularly with heavy random writes.
- Complexity: The advanced features of Btrfs come with increased complexity.
Technical Details 🔍
- Maximum File Size: 16 EiB
- Maximum Volume Size: 16 EiB
- Better on SSDs: Btrfs is well-suited for flash/solid-state storage because of TRIM support and CoW, which reduces write amplification.
Distro Usage
Btrfs has been in the mainline linux Kernel since 2008 it is the default file system for SUSE and Fedora
4. OpenZFS 💾 (Unix)
Intro
OpenZFS is an advanced file system and volume manager that originated from Sun Microsystems' ZFS and is now maintained by the OpenZFS project.
Links
https://en.wikipedia.org/wiki/OpenZFS https://openzfs.org/wiki/Main_Page
Technical Features: 🔍
- Copy-on-Write (COW)
- Snapshots and Clones
- Pooled Storage (ZFS Storage Pools)
- Dynamic Striping
- Built-in RAID Support (RAID-Z1, RAID-Z2, RAID-Z3)
- Data and Metadata Checksumming
- Self-Healing
- Deduplication
- Compression (LZ4, GZIP, ZLE, etc.)
- Online Resizing
- Dynamic Block Size
- End-to-End Data Integrity
- ZFS Datasets (File Systems and Volumes)
- Adaptive Replacement Cache (ARC)
- Transparent Data Encryption
- ZFS Send/Receive for Backup and Replication
Advantages 👍
- Data Integrity: Uses end-to-end checksums for all data, ensuring high data integrity.
- Snapshots and Clones: Supports efficient, low-overhead snapshots and clones, useful for backups and development.
- RAID-Z Support: Offers advanced RAID options (RAID-Z1, RAID-Z2, RAID-Z3), providing redundancy and fault tolerance.
- Compression: Built-in compression can save space and improve performance in certain workloads.
- Scalability: Designed to handle very large data sets and scales well with both size and number of files.
Downsides 👎
- Resource Intensive: Can be resource-intensive, particularly in terms of memory usage.
- Complexity: The advanced features and flexibility of OpenZFS come with a steep learning curve.
- Portability: While available on many platforms, it is not as natively supported in Linux as ext4 or XFS.
- Licensing: OpenZFS is licensed under CDDL, which is incompatible with the GPL.
Technical Details 🔍
- Maximum File Size: 16 EiB
- Maximum Volume Size: 256 ZiB (theoretical)
Distro Usage
Open ZFS is Not available in the mainline Linux Kernel. Rather, it is available through a 3rd party module. Works on Linux, BSD, and Mac
HAMMER2 💾 (DragonflyBSD)
Intro
Hammer2 is a modern, advanced file system designed for high-performance and scalable storage solutions, particularly in clustered environments. It features robust capabilities such as copy-on-write, data deduplication, and built-in snapshots, providing high data integrity, efficient storage management, and instant crash recovery.
Links
Wikipedia: HAMMER2 DragonFly BSD Hammer2
Technical Features: 🔍
- Clustered File System Support
- Snapshot and Cloning Support
- Copy-on-Write (COW)
- Data Deduplication
- Data Compression (LZ4, ZLIB)
- Data and Metadata Checksumming
- Multi-Volume Support
- Instant Crash Recovery
- Fine-Grained Locking (for SMP scalability)
- RAID Support (1, 1+0)
- Thin Provisioning
- Asynchronous Bulk-Freeing
- Large Directory Support
- Built-in Data Integrity and Self-Healing
Advantages 👍
- High Performance: Optimized for high-performance and scalable storage solutions.
- Data Integrity: Incorporates checksumming and self-healing features to maintain data integrity.
- Efficient Storage Management: Offers advanced features like data deduplication and compression to manage storage efficiently.
- Scalability: Designed to handle large volumes of data and support clustered environments.
Downsides 👎
- Complexity: The advanced features and configuration options can introduce complexity.
- Maturity: As a newer file system, it may have fewer tools and less mature support compared to more established file systems.
- Limited Adoption: Less commonly used than other file systems, which may affect community support and documentation.
Technical Details 🔍
- Maximum File Size: Not explicitly defined, but supports very large files.
- Maximum Volume Size: Not explicitly defined, but designed for large-scale storage.
Distro Usage
- DragonFly BSD: The primary platform where Hammer2 is used and supported.
- Limited Availability: Not available in mainstream Linux distributions; primarily associated with DragonFly BSD.
Key Concepts / Glossary 🔑
Snapshots 📸
- Snapshots are read-only copies of a file system at a specific point in time, allowing users to save the state of the file system for backup and recovery purposes. They are efficient and consume minimal space, as only the differences between the current state and the snapshot are stored.
Clones vs. Snapshots 📸🧬
- Snapshots: Read-only copies of the file system at a specific time.
- Clones: Writable copies of snapshots that can be modified independently.
RAID-Z Levels ⛓️
- RAID-Z1: Single parity; can tolerate the loss of one disk.
- RAID-Z2: Double parity; can tolerate the loss of two disks.
- RAID-Z3: Triple parity; can tolerate the loss of three disks.
RAID 5 and RAID 6 ⛓️
- RAID 5: Stripes data across disks with single parity; can tolerate the loss of one disk.
- RAID 6: Stripes data across disks with double parity; can tolerate the loss of two disks.
Issues with RAID 5/6 in Btrfs
Btrfs's implementation of RAID 5/6 is considered unstable due to issues like the write hole problem, making it less reliable for production use. Data integrity may be compromised, leading to potential data loss.
CDDL License 🪪
The Common Development and Distribution License (CDDL) is an open-source license created by Sun Microsystems. It is incompatible with the GPL, which can complicate integration with Linux.
Btrfs Self-Healing ❤️🩹
Self-Healing in Btrfs works by verifying data against checksums and repairing any detected corruption using redundant data stored on other disks in a RAID configuration.
Dynamic Storage 🧱
Dynamic Storage refers to the ability to manage multiple storage devices within a single file system, allowing for on-the-fly addition and removal of devices, with the file system automatically balancing data across them.
Online Resizing 🗺️
Online Resizing allows the resizing of a file system while it is mounted and in use. XFS supports growing the file system online, while Btrfs supports both growing and shrinking.
B-Trees ⚖️
A B-tree is a self-balancing tree data structure that maintains sorted data and allows efficient insertion, deletion, and search operations. B-trees are used in file systems like Btrfs to manage metadata and data blocks.
Extent Base Allocation 👠
is a method used by modern file systems to manage data storage efficiently. Instead of tracking individual fixed-size blocks, the file system groups contiguous blocks into larger units called extents.
Persistent Pre-allocation 🎟️
This technique reserves a specific amount of disk space for a file in advance, ensuring that the allocated space remains available, which helps in reducing fragmentation and guaranteeing storage for large files.
Delayed Allocation ⏱️
Delayed allocation defers the assignment of specific disk blocks to file data until the data is flushed to disk, optimizing the allocation process and reducing fragmentation by allowing the file system to make better decisions about where to place data.
Multi-block Allocation ⋔
Multi-block allocation allows a file system to allocate multiple contiguous blocks at once, rather than individually, improving performance and reducing fragmentation, especially for large files.
Stripe-aware Allocation 🧠
Stripe-aware allocation is used in RAID configurations to ensure that data is distributed evenly across all disks in the array, optimizing performance by aligning data placement with the underlying stripe size of the RAID setup.
Fine-Grained Locking (for SMP Scalability) 🚀
Fine-grained locking applies locks at a granular level, allowing multiple processors to concurrently access different parts of the file system, enhancing performance and scalability in multi-core environments.
RAID 1+0 🖇️
RAID support includes configurations such as RAID 1 for data mirroring and RAID 1+0 for combining mirroring with striping to provide both redundancy and improved performance.
Thin Provisioning 🔮
Thin provisioning allocates disk space on-demand rather than reserving it all upfront, optimizing storage utilization by only using the space actually required by data.
Asynchronous Bulk-Freeing 🗑️
Asynchronous bulk-freeing performs large-scale space reclamation in the background, allowing the file system to manage deletions efficiently without impacting overall performance.
Large Directory Support 🏢
Large directory support enables efficient management of directories with a vast number of entries, using optimized data structures to ensure fast performance for directory operations.
Btrfs 💾
Btrfs stands for B-tree File System, not "Better File System," though it’s easy to see why people might think that. I believe Btrfs is the future for both small and large-scale projects, as it reduces the need for manual and automated maintenance, while simplifying backup and restoration processes.
This article aims to shed light on the history and motivation behind creating Btrfs, its core functionality, and the standout features that set it apart from the competition.
History
Motivation
The idea for Btrfs was first proposed by IBM researcher and bioinformatician Ohad Rodeh at a USENIX conference in 2007. The goal was to develop a copy-on-write (COW)-friendly B-tree algorithm, which would allow for efficient data storage and retrieval without the overhead typical of other file systems.
As Valerie Aurora explained:
"To start with, B-trees in their native form are wildly incompatible with COW. The leaves of the tree are linked together, so when the location of one leaf changes (via a write—which implies a copy to a new block), the link in the adjacent leaf changes, which triggers another copy-on-write and location change, which changes the link in the next leaf... The result is that the entire B-tree, from top to bottom, has to be rewritten every time one leaf is changed."
– Valerie Aurora1
Chris Mason, a core developer of the Reiser Filesystem, liked the idea and saw an opportunity to move beyond Reiser, which used B-trees but wasn’t optimized for COW. Mason brought the idea to his new job at Oracle, where development of Btrfs began in earnest.
"I started Btrfs soon after joining Oracle. I had a unique opportunity to take a detailed look at the features missing from Linux, and felt that Btrfs was the best way to solve them."
– Chris Mason2
In collaboration with Oracle colleague Zach Brown, they drafted the initial version of Btrfs.
Rapid Development ⏱️
Thanks to corporate backing and a team of experienced developers, Btrfs moved through an aggressive development cycle. Within two years of the technical proposal, a working 1.0 version of Btrfs was released in late 2008.
Shortly after its introduction, Btrfs was merged into the mainline Linux kernel. Despite the conservative nature of file system adoption—where admins, systems engineers, and software engineers prefer proven, stable systems—Btrfs quickly gained traction.
In 2015, SUSE Linux Enterprise Server (SLES) became the first major Linux distribution to adopt Btrfs as its default file system, citing it as the future of Linux storage solutions.
Enterprise Adoption 📊
Today, Btrfs is the default file system for several major enterprise Linux distributions, including SUSE, Fujitsu Linux, Ubuntu, Oracle Linux, and popular user distributions like Fedora, Arch, and Gentoo.
In fact, Meta (formerly Facebook) uses Btrfs to manage their large, dynamic data sets. According to core developer Josef Bacik, using Btrfs at Meta has significantly reduced access times and contributed to cost reductions in production environments.3
How Btrfs Works ⚙️
The B-Tree+ Algorithm 🌳
At its core, Btrfs relies on a B-tree, a type of data structure designed to organize and store data efficiently.
Here is a basic diagram of a B-tree, though in file systems, it gets more complex:
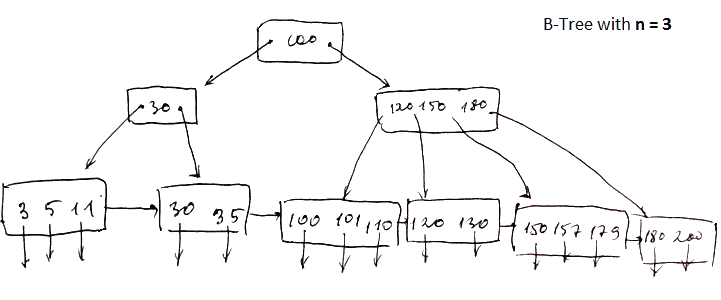
A B-tree consists of nodes and links (sometimes referred to as keys and pointers or leaves and branches), which drastically reduce seek time. This ensures that, no matter how much data you store, finding the right file is quick and doesn’t require searching through everything.
The root node is a type of index stored in a fixed location on the disk. It serves as the starting point for a rapid search called fanning out.
This structure reduces disk access time and, in turn, improves overall system efficiency. The relationship between the depth of nodes and the breadth of data is known as the fan-out factor. Tuning this ratio can either speed up searches (with a wider spread) or reduce write size for smaller segments.
Copy-on-Write (COW) 🐄
Copy-on-Write (COW) is a method where data and metadata are not overwritten in place. Instead, they are copied to a new location before the update is finalized. Btrfs employs COW in conjunction with its B-tree algorithm to maintain data integrity.
Btrfs also uses delayed allocation, where metadata is updated first, linking it to new data before the actual data is copied Persistant Pre Allocation to a new location. This delay allows the file system to organize sector placement called Extent Base Allocation and optimize metadata before the actual write Multi-Block Allocation, reducing unnecessary reads and writes.
This delayed allocation process supports wear leveling (also known as TRIM) on SSDs, where data is written to new sectors to avoid repeatedly writing to the same location, thus extending the lifespan of the drive.
Snapshots 📸
Snapshots are one of Btrfs's standout features. They use COW to create lightweight, efficient snapshots of data at any given time.
Unlike traditional Linux filesystems, which only allow snapshots of logical volumes, Btrfs can snapshot both volumes and subvolumes. This means that the entire data set—down to the subvolume level—can be efficiently snapshotted. Snapshots in Btrfs do not require duplication of data, only tracking changes made after the snapshot was taken.
Cloning 🐑🐑
Cloning in Btrfs allows you to create writeable copies of subvolumes or snapshots, which share the same data blocks until changes are made. Unlike traditional file copying, cloning doesn't duplicate the original data, making it fast and storage-efficient. When modifications are made, only the changed blocks are copied, leaving the rest shared between the clone and the original.
This makes cloning in Btrfs ideal for use cases where multiple environments or datasets need to be derived from the same base system, without significant storage overhead.
Dynamic Online Storage 📈📉
Btrfs allows you to manage storage pools dynamically with online resizing and device management, meaning that you can expand and shrink file systems while they are mounted and in use. This flexibility helps reduce downtime and allows systems to scale easily with growing storage needs.
Expanding Disk Pools 🏊♂️🏊♂️🏊♂️
You can add new disks to a Btrfs file system without stopping the system. With a simple command, Btrfs integrates the new storage into the existing pool, redistributing data across devices if necessary. This feature makes Btrfs highly scalable, especially in environments where storage demands can grow unpredictably.
Resizeable 📏
Btrfs volumes can be expanded or shrunk online, without unmounting the file system. Expanding is as simple as adding more storage, while shrinking requires no special process apart from the resizing command. This dynamic resizing means you can adjust the size of your file system to suit your current storage needs.
Self-Healing ❤️🩹
Btrfs provides self-healing capabilities when used in a redundant RAID setup. Through data and metadata checksumming, Btrfs can detect corrupted blocks and automatically fix them using redundant copies of the data. This ensures data integrity without user intervention, particularly useful for critical data environments.
Compression 🪗
Btrfs supports transparent compression, which means files can be compressed as they are written to disk, saving space without requiring manual compression. It supports multiple algorithms like LZO, Zlib, and Zstandard (ZSTD), each with different balances of speed and compression ratio. This feature helps save storage space and can improve performance, especially when working with large datasets.
Technical Feature List: 🔍
- Journaling: Keeps track of changes before they are committed, helping with data recovery in case of a crash.
- Extent Base Allocation: Allocates large, contiguous blocks of storage to reduce fragmentation.
- Persistent Pre-allocation: Reserves space for a file at creation to prevent fragmentation and improve performance.
- Delayed Allocation: Delays the allocation of disk space until data is written, optimizing space management.
- Multi-block Allocation: Allocates multiple blocks at once to increase efficiency, especially for large files.
- Stripe-aware Allocation: Optimizes block allocation for RAID systems by aligning data with RAID stripes.
- Resizeable with resize2fs: Can be resized (grown or shrunk) using the resize2fs tool.
- B-tree Balancing Algorithm - Different from XFS (COW B Tree): Uses a specific B-tree balancing algorithm for efficient file system organization and copy-on-write operations.
- Copy-on-Write (COW): Writes modified data to new locations rather than overwriting existing data, preventing data corruption.
- Snapshots and Clones: Creates point-in-time copies of data (snapshots) and allows for duplication (clones) without full data replication.
- Built-in RAID Support: Provides native support for RAID configurations, improving data redundancy and performance.
- Data and Metadata Checksumming: Ensures data integrity by verifying both data and metadata through checksums.
- Self-Healing: Automatically repairs corrupted data using mirrored or parity blocks in RAID configurations.
- Dynamic Subvolumes: Supports the creation of isolated subvolumes within the same file system for better data management.
- Online Resizing: Allows the file system to be resized while it's still mounted and in use.
- Compression (LZO, ZLIB, ZSTD): Offers various compression algorithms to reduce storage space usage.
- Deduplication: Eliminates duplicate copies of repeating data to save space.
Core Commands 🪨
mkfs.btrfs
Creates a new Btrfs file system on a specified device or partition.
btrfs subvolume create
Creates a new subvolume within an existing Btrfs file system.
btrfs subvolume delete
Deletes a specified subvolume from the Btrfs file system.
btrfs subvolume list
Lists all subvolumes within a Btrfs file system.
btrfs filesystem show
Displays detailed information about the Btrfs file systems on all mounted devices.
btrfs filesystem df
Shows disk space usage, including metadata and data, for a Btrfs file system.
btrfs balance start
Begins a balancing operation to redistribute data and metadata across the Btrfs file system.
btrfs balance cancel
Cancels an ongoing balancing operation.
btrfs scrub start
Initiates a scrub operation to verify data integrity on a Btrfs file system.
btrfs scrub status
Shows the status of an ongoing scrub operation.
btrfs device add
Adds a new device to an existing Btrfs file system, allowing for dynamic storage expansion.
btrfs device delete
Removes a specified device from a Btrfs file system.
btrfs device stats
Displays statistics and error information about devices in a Btrfs file system.
btrfs check
Checks the integrity of a Btrfs file system, often used for troubleshooting.
btrfs rescue chunk-recover
Attempts to recover data chunks from a damaged Btrfs file system.
btrfs filesystem resize
Resizes a Btrfs file system, either expanding or shrinking it dynamically.
btrfs snapshot
Creates a read-only or read-write snapshot of a subvolume or file system.
btrfs property set
Modifies properties of a Btrfs file system or its subvolumes (e.g., enabling compression).
btrfs quota enable
Enables quota enforcement on a Btrfs file system to limit space usage.
btrfs quota rescan
Rescans the file system to enforce or update quota limits.
Conclusion
Well I hope that has opened your eyes to the benefits of Btrfs. Researching for this article has helped me to learn some more about the subject. If will definitely add to the article as I learn more about the subject, so consider this evergreen information 🌲
Helpful Links ⛓️
https://en.wikipedia.org/wiki/Btrfs https://docs.kernel.org/filesystems/btrfs.html Footnotes
The above quote is excerpted from Valerie Aurora Article lwn.net, 2009.
Chris Mason Interview during LF Collaboration Summit, 2009.
The above reference is to the first proposal for the Btrfs file system Technical Proposal during Gopherfest, Tues, June 12th, 2017.
Btrfs at Scale: How Meta Depends on Btrfs for our entire infrastructure. Presented by Josef Bacik of Meta Presentation Open Source Summit, 2023.
Systems Engineering
🔑 Key Systems Engineering Concepts
Performance Vs. Scalability
A service is scalable if it results in increased performance in a manner proportional to resources added. Generally, increasing performance means serving more units of work, but it can also be to handle larger units of work, such as when datasets grow.
Latency Vs. Throughoutput
Latency and throughput are two important measures of a system’s performance. Latency refers to the amount of time it takes for a system to respond to a request. Throughput refers to the number of requests that a system can handle at the same time. Generally, you should aim for maximal throughput with acceptable latency.
Availability Vs. Consistency
Availability
refers to the ability of a system to provide its services to clients even in the presence of failures. This is often measured in terms of the percentage of time that the system is up and running, also known as its uptime.
Consistency
On the other hand, refers to the property that all clients see the same data at the same time. This is important for maintaining the integrity of the data stored in the system. In distributed systems, it is often a trade-off between availability and consistency. Systems that prioritize high availability may sacrifice consistency, while systems that prioritize consistency may sacrifice availability. Different distributed systems use different approaches to balance the trade-off between availability and consistency, such as using replication or consensus algorithms.
CAP Theorem
AP - Availability + Partition Tolerance CP - Consistency + Partition Tolerance
Consistency Patterns
Weak Consistency
Weak consistency patterns in distributed systems refer to scenarios where not all nodes immediately reflect updates to a shared state. These patterns prioritize availability and partition tolerance over immediate consistency, allowing for temporary discrepancies between nodes. This approach is suitable for systems where immediate consistency is less critical, and eventual consistency—where all nodes will eventually converge to the same state—is acceptable. Weak consistency can lead to better performance and scalability, as it reduces the overhead of maintaining strict synchronization across distributed components.
Key Characteristics:
- Prioritizes availability and partition tolerance.
- Allows temporary discrepancies between nodes.
- Ensures eventual consistency.
- Reduces synchronization overhead.
- Improves performance and scalability.
- Suitable for applications where immediate consistency is not critical.
- Can result in stale reads and temporary data inconsistency.
Eventual Consistency
Eventual consistency is a consistency model used in distributed systems where updates to a data item will eventually propagate to all nodes, ensuring that all replicas converge to the same state over time. Unlike strong consistency models that require immediate synchronization, eventual consistency allows for temporary inconsistencies between nodes. This model is ideal for systems that prioritize availability and partition tolerance, as it permits operations to continue even during network partitions or node failures. Eventual consistency is commonly employed in large-scale, distributed databases and systems where immediate accuracy is not critical.
Key Characteristics:
- Ensures all replicas converge to the same state over time.
- Allows temporary inconsistencies between nodes.
- Prioritizes availability and partition tolerance.
- Suitable for large-scale distributed systems.
- Permits continued operation during network partitions or node failures.
- Reduces synchronization overhead.
- Common in NoSQL databases and large-scale cloud systems.
Strong Consistency
Strong consistency is a consistency model in distributed systems where any read operation returns the most recent write for a given piece of data, ensuring immediate synchronization across all nodes. This model guarantees that once a write operation is confirmed, all subsequent read operations will reflect that write, providing a uniform view of the data across the system. Strong consistency is critical for applications requiring precise and immediate data accuracy, such as financial transactions or inventory management. However, achieving strong consistency often involves higher latency and reduced availability due to the overhead of coordinating updates across multiple nodes.
Key Characteristics:
- Guarantees immediate synchronization across all nodes.
- Ensures read operations return the most recent write.
- Provides a uniform view of data.
- Critical for applications needing precise and immediate data accuracy.
- Involves higher latency and reduced availability.
- Requires coordination of updates across multiple nodes.
- Common in systems where data integrity is paramount.
Availability Patterns
Failover
is a process in which a system automatically switches to a standby or backup component when the primary component fails or becomes unavailable. This mechanism is designed to ensure the continued availability and reliability of services, minimizing downtime and maintaining operational continuity. Failover can be implemented at various levels, including hardware, software, or network systems, and typically involves monitoring the health of the primary component, detecting failures, and seamlessly transferring operations to a backup. The goal is to provide high availability and prevent disruption in critical services or applications.
Active
Active failover patterns refer to a high-availability configuration where multiple instances of a system are active and handle traffic simultaneously. In this setup, all nodes are actively processing requests and sharing the load, providing redundancy and ensuring continuous operation even if one or more instances fail. This approach improves performance and resilience by distributing workload across multiple active instances and enabling automatic failover without significant downtime. It contrasts with active-passive patterns, where only one instance is active at a time while others remain on standby.
Passive
Passive failover patterns are a high-availability configuration where one instance of a system is active and handles all traffic, while one or more passive instances remain on standby, ready to take over in case of a failure. In this setup, the active instance performs all processing tasks, and the passive instances are kept synchronized with the active one, but do not handle traffic unless needed. This approach ensures that there is a backup available to take over seamlessly if the active instance fails, although it may involve some downtime during failover. Active-passive patterns are simpler to implement than active-active configurations but might not utilize resources as efficiently.
Replication
Replication is the process of copying and maintaining data across multiple systems or locations to ensure consistency, reliability, and availability. By duplicating data, replication allows for data redundancy, which enhances fault tolerance and enables data recovery in case of hardware failures or data corruption. This process can be implemented at various levels, such as database, file systems, or network services, and can be configured to occur synchronously or asynchronously. Replication helps distribute load, improve performance, and ensure that data remains accessible even if one or more nodes fail.
Master-Slave
Master-slave replication is a data replication model where one node, known as the master, is responsible for handling all write operations, while one or more nodes, known as slaves, handle read operations and replicate the data from the master. In this setup, the master node processes and updates data, which is then propagated to the slave nodes. This model allows for load balancing of read requests and provides redundancy, as the slave nodes can serve as backups if the master fails. However, it also introduces a single point of failure and potential replication lag.
Key Characteristics
- One master node handles all write operations.
- One or more slave nodes handle read operations.
- Data is replicated from the master to the slaves.
- Allows load balancing of read requests.
- Provides redundancy and backup through slave nodes.
- May introduce replication lag and a single point of failure.
- Suitable for read-heavy workloads with occasional write operations.
Master-Master
replication, also known as multi-master replication, is a data replication model where multiple nodes act as masters, each capable of handling both read and write operations. In this setup, changes made to any master node are replicated to all other master nodes, allowing for high availability and load distribution. This model supports bi-directional synchronization and enables fault tolerance, as any node can take over if another fails. However, it introduces complexities such as conflict resolution and data consistency challenges due to simultaneous updates on multiple nodes.
Key Characteristics
- Multiple nodes act as masters, handling both read and write operations.
- Changes are replicated across all master nodes.
- Supports bi-directional synchronization.
- Enhances high availability and load distribution.
- Provides fault tolerance with any node able to take over.
- Requires conflict resolution mechanisms for simultaneous updates.
- Can introduce complexity in maintaining data consistency.
Background Jobs
Background jobs are tasks or processes that run asynchronously and independently of the main application workflow. They are typically used for long-running, resource-intensive operations that do not need to be completed immediately, such as data processing, email notifications, or periodic tasks. By offloading these tasks to background jobs, applications can maintain responsiveness and avoid blocking user interactions. Background jobs are managed by job queues and workers, which handle the execution of tasks outside of the main application threads, often allowing for retry mechanisms, scheduling, and monitoring.
Key Characteristics
- Run asynchronously and independently of the main application workflow.
- Used for long-running or resource-intensive tasks.
- Offload tasks to maintain application responsiveness.
- Managed by job queues and workers.
- Support retry mechanisms and scheduling.
- Allow monitoring and logging of task execution.
- Improve overall performance and user experience.
Event Driven Background Jobs
Event-driven background jobs are tasks that are triggered and executed based on specific events or changes in the system rather than being scheduled at fixed intervals. This approach allows jobs to respond dynamically to events such as user actions, system updates, or external messages. By using an event-driven model, applications can process tasks more efficiently and in real time, as jobs are only executed when relevant events occur. This can improve resource utilization and reduce unnecessary processing by ensuring that background jobs are only performed when needed.
Schedule Driven Background Jobs
Schedule-driven background jobs are tasks that are executed based on a predetermined schedule or time intervals, rather than being triggered by specific events. These jobs are planned to run at regular intervals, such as hourly, daily, or weekly, and are useful for repetitive tasks that need to occur at specific times or frequencies. Scheduling allows for systematic and predictable execution of tasks, such as batch processing, data backups, or periodic maintenance. This approach ensures that jobs are performed consistently according to the defined schedule, regardless of other system activities.
Key Characteristics
- Executed based on a predetermined schedule or time intervals.
- Useful for repetitive tasks with regular timing requirements.
- Ensures systematic and predictable execution of tasks.
- Commonly used for batch processing, backups, and maintenance.
- Allows for planning and automation of routine operations.
- Can be managed by scheduling systems or cron jobs.
- Ensures tasks are performed consistently according to the defined schedule.
Result Return Background Jobs
Returning results refers to the process of delivering the output or response from background jobs back to the requesting system or user after the job has been completed. This involves capturing the results of the background task, such as processed data or computed values, and ensuring they are accessible or communicated to the appropriate component. This step is crucial for integrating the outcomes of asynchronous operations into the main application workflow, enabling users or systems to make use of the results as needed. Effective result handling ensures that background jobs provide meaningful and timely output for further processing or user interaction.
- Involves delivering output or response after background job completion.
- Captures results like processed data or computed values.
- Ensures results are communicated to the requesting system or user.
- Integrates outcomes into the main application workflow.
- Enables further processing or user interaction with the results.
- Can involve result storage, notifications, or direct updates.
- Important for completing the feedback loop of asynchronous operations.
A Domain Name System (DNS) translates a domain name such as www.example.com to an IP address.
DNS is hierarchical, with a few authoritative servers at the top level. Your router or ISP provides information about which DNS server(s)
- to contact when doing a lookup. Lower level DNS servers cache mappings,
- which could become stale due to DNS propagation delays. DNS results can
- also be cached by your browser or OS for a certain period of time,
- determined by the time to live (TTL).
- NS record (name server) - Specifies the DNS servers for your domain/subdomain.
- MX record (mail exchange) - Specifies the mail servers for accepting messages.
- A record (address) - Points a name to an IP address.
- CNAME (canonical) - Points a name to another name or CNAME (example.com to www.example.com) or to an A record.
Content Delivery Networks
Push CDN's Pull CDN's
Load Balancer
Load balancers distribute incoming client requests to computing resources such as application servers and databases. In each case, the load balancer returns the response from the computing resource to the appropriate client. Load balancers are effective at:
- Preventing requests from going to unhealthy servers
- Preventing overloading resources
- Helping to eliminate a single point of failure
Load Balancer vs. Remote Proxy
Load balancing and remote proxy serve distinct purposes in network management. Load balancing distributes incoming network traffic across multiple servers to optimize resource utilization, ensure high availability, and improve response times. It focuses on efficiently managing the workload among several servers. On the other hand, a remote proxy acts as an intermediary between clients and servers, forwarding client requests to the server and returning the server's response to the client. It is primarily used for anonymity, security, caching, and access control. While both can enhance performance and security, their roles and functionalities differ significantly.
Key Differences:
Purpose:
Load Balancing: Distributes traffic to multiple servers. Remote Proxy: Acts as an intermediary to forward requests and responses.
Primary Goal:
Load Balancing: Optimize resource use and availability. Remote Proxy: Enhance security, anonymity, and access control.
Implementation Level:
Load Balancing: Operates at transport (Layer 4) or application (Layer 7) levels. Remote Proxy: Operates at the application level.
Use Cases:
Load Balancing: High traffic websites, distributed systems. Remote Proxy: Secure browsing, content filtering, caching.
Load Balancing Algorithms
Load balancing algorithms are methods used to efficiently distribute incoming network traffic across multiple servers or resources. These algorithms determine the most suitable server to handle each request, optimizing resource use, improving response times, and ensuring no single server becomes overwhelmed. By implementing effective load balancing algorithms, systems can achieve higher availability, reliability, and performance. Different algorithms offer varying strategies for distribution, catering to specific requirements and workload patterns.
Popular Load Balancing Algorithms:
- Round Robin
- Least Connections
- Least Response Time
- Source IP Hash
- Weighted Round Robin
- Weighted Least Connections
- Random
Layer 7 Load Balancing
Layer 7 load balancing operates at the application layer of the OSI model, distributing network traffic based on application-level data such as HTTP headers, URLs, or cookies. This type of load balancing enables more intelligent routing decisions by inspecting the content of the requests and directing them to the appropriate servers based on specific rules. It supports advanced features like SSL termination, content-based routing, and user session persistence, making it ideal for web applications that require detailed traffic management and the ability to deliver personalized user experiences.
Layer 4 Load Balancing
Layer 4 load balancing operates at the transport layer of the OSI model, directing network traffic based on data from the transport layer protocol, such as TCP or UDP. It uses information like source and destination IP addresses and ports to distribute incoming traffic across multiple servers, ensuring optimal resource utilization, high availability, and redundancy. By balancing traffic at this layer, it can handle a large volume of requests with minimal processing overhead, making it suitable for scenarios where quick and efficient distribution of traffic is required without the need for deep inspection of the packet content.
Horizontal Scaling
https://youtu.be/dvRFHG2-uYs
Microservices
Microservices are an architectural style in software development where an application is structured as a collection of loosely coupled, independently deployable services. Each service is fine-grained and focuses on a specific business function, allowing for better scalability, flexibility, and maintenance. This approach contrasts with traditional monolithic architectures, where all functionalities are tightly integrated into a single system. By using microservices, organizations can adopt a more agile development process, enabling faster updates and improvements to individual components without affecting the entire application.
Service Discovery
Service discovery is a key component in microservices architectures that automates the detection of services in a network. It enables services to find and communicate with each other dynamically without needing hard-coded IP addresses or endpoints. This is essential for managing microservices at scale, as it ensures that services can locate each other, even as they scale up or down, move across hosts, or change due to updates. Service discovery typically involves a service registry, where service instances register their availability, and clients query this registry to find the locations of services they need to interact with.
...
Ansible
Ansible is a powerful open-source automation tool that simplifies the management of IT systems by enabling consistent, repeatable configurations and deployments. Known for its agentless architecture, Ansible uses simple YAML files called playbooks to define automation tasks, making it accessible even to those new to coding. With its focus on simplicity and scalability, Ansible is widely used for automating repetitive tasks, configuring systems, and deploying applications across diverse environments. Whether you’re managing a single server or orchestrating a complex infrastructure, Ansible streamlines operations, improves efficiency, and reduces the risk of errors. Its flexibility and ease of use make it an indispensable tool for modern IT workflows.
Agentless?
Agentless means that the target computer (host) does not require the installation of any software in order to be controlled/ configured. All that is really required is SSHD (SSH Server) to be enabled as a service, typically done with SystemD and configured in /etc/ssh. This advantageous because ansible can be used offline, used to bootstrap a system, used to install and configure software, even in secure environments.
Installation
I have found that on bare bones red hat distros like Rocky, an order of operations should be followed.
- Install Enterprise Extras (EPEL)
- Install Python3
- Install Ansible
Setup
- /etc/ansible
- Hostfile
- Playbooks
Concepts 🔑
KeyStore
github.com/username.keys
SSH Public Key Storage: It often contains the public SSH key (~/.ssh/id_rsa.pub) for the specified user (username), used by Ansible to securely connect to remote hosts during the bootstrapping process.
Terraform
Terraform is a powerful open-source tool designed for building, managing, and versioning infrastructure as code (IaC). Developed by HashiCorp, Terraform allows you to define your infrastructure in a declarative configuration language, enabling consistent and repeatable deployments across cloud providers and on-premises environments. With Terraform, you can provision and manage resources such as virtual machines, networks, and storage with ease, using a unified workflow that works across multiple platforms. Its state management and dependency resolution features ensure your infrastructure remains predictable and aligned with your desired configurations. Whether you’re deploying a small application or managing enterprise-scale infrastructure, Terraform simplifies the process and provides a scalable solution for modern DevOps practices.
Install
sudo dnf install terraform -y
Example
# Define provider (example: AWS)
provider "aws" {
  region = "us-east-1"
}

# Create a security group to allow HTTP and SSH access
resource "aws_security_group" "rocky_security_group" {
  name        = "rocky-nginx-sg"
  description = "Allow HTTP and SSH"

  ingress {
    description = "Allow SSH"
    from_port   = 22
    to_port     = 22
    protocol    = "tcp"
    cidr_blocks = ["0.0.0.0/0"]
  }

  ingress {
    description = "Allow HTTP"
    from_port   = 80
    to_port     = 80
    protocol    = "tcp"
    cidr_blocks = ["0.0.0.0/0"]
  }

  egress {
    from_port   = 0
    to_port     = 0
    protocol    = "-1"
    cidr_blocks = ["0.0.0.0/0"]
  }
}

# Create a Rocky Linux EC2 instance
resource "aws_instance" "rocky_instance" {
  ami           = "ami-0c6b1d09930fac512" # Replace with a Rocky Linux AMI ID for your region
  instance_type = "t2.micro"
  key_name      = "your-ssh-key-name"      # Replace with your SSH key name
  security_groups = [aws_security_group.rocky_security_group.name]

  tags = {
    Name = "rocky-nginx-server"
  }

  provisioner "remote-exec" {
    inline = [
      "sudo yum install -y nginx",
      "sudo systemctl enable nginx",
      "sudo systemctl start nginx"
    ]

    connection {
      type        = "ssh"
      user        = "rocky"                # Default user for Rocky Linux AMI
      private_key = file("~/.ssh/your-ssh-key.pem") # Replace with your SSH key path
      host        = self.public_ip
    }
  }
}

# Output the public IP of the instance
output "instance_public_ip" {
  value = aws_instance.rocky_instance.public_ip
}
Podman
Podman is a powerful, open-source container management tool designed to simplify the deployment and management of containers and containerized applications. Unlike traditional container engines, Podman is daemonless, meaning it does not rely on a central service. This architecture provides enhanced security and flexibility, as it reduces the attack surface and eliminates the need for a root-level daemon. Podman also mirrors Docker’s command-line interface, allowing developers and system administrators to transition seamlessly between the two tools.
One of Podman’s standout features is its focus on modern orchestration needs. Built with Kubernetes in mind, Podman integrates sophisticated features that allow users to convert containers or pods directly into declarative Kubernetes manifests. Additionally, Podman supports rootless containers, enabling unprivileged users to manage containers securely without elevated permissions. Whether you’re building, running, or transitioning to orchestrated environments, Podman offers a lightweight, versatile, and robust solution tailored for contemporary DevOps workflows.
Demo
GO static page server
within an interactive Alpine container running on Podman:
podman run -d -i -t --name <name of container> -p 8080:8080 docker.io/library/golang:alpine
Note: These commands let one create, detach, attach, interactive with and expose a new container with a specified name, the individual components of this command go as such: -d Detached (runs in background) -i (Interactive Mode) -t(TTY Mode) --name example (name the container) -p (specify ports host:container) - 8080:8080 listen/broadcast on port 80 of the container (Differs from the internal network) - docker.io/library/golang:alpine
Step 1: Check up on the container
$ podman ps
Step 2: Attach to the container
$ podman attach <name>

$ apk add vim
Step 3: Create a project directory within the container
$ mkdir root/static/templates
Step 4: Create an HTML file in templates
$ vim index.html

    <!DOCTYPE html>
    <html lang="en">
    <head>
        <meta charset="UTF-8">
        <meta name="viewport" content="width=device-width, initial-scale=1.0">
        <title>Landing Page</title>
        <script src="https://cdn.tailwindcss.com"></script>
    </head>
    <body class="bg-gray-100 flex items-center justify-center min-h-screen">
        <div class="text-center p-6 bg-white rounded-lg shadow-lg">
            <h1 class="text-4xl font-bold text-gray-800 mb-4">Welcome to the Served Index Page</h1>
            <p class="text-gray-600 text-lg mb-6">
                This page is being served to port 80 from a running container.
            </p>
            <p class="text-xl font-semibold text-gray-700 mb-8">
                Learn more
            </p>
            <div class="flex justify-center space-x-4">
                <a href="https://podman.io/" target="_blank" class="px-6 py-2 bg-purple-600 text-white rounded-lg hover:bg-purple-700 transition">
                    Podman Documentation
                </a>
                <a href="https://go.dev/" target="_blank" class="px-6 py-2 bg-blue-600 text-white rounded-lg hover:bg-blue-700 transition">
                    Go Website
                </a>
                <a href="https://www.w3.org/" target="_blank" class="px-6 py-2 bg-green-600 text-white rounded-lg hover:bg-green-700 transition">
                    W3C Website
                </a>
            </div>
        </div>
    </body>
    </html>


:wq
Step 6:
Move back up to the root of the project directory and create the go static page server file
$ cd ../..
in the project root directory
vim main.go
paste this:
    package main

    import (
        "html/template"
        "net/http"
        "log"
    )

    func main() {
        // Handle root route
        http.HandleFunc("/", func(w http.ResponseWriter, r *http.Request) {
            tmpl, err := template.ParseFiles("static/templates/index.html")
            if err != nil {
                http.Error(w, err.Error(), http.StatusInternalServerError)
                return
            }
            tmpl.Execute(w, nil)
        })

        // Start server on port 8080
        log.Println("Server started at http://localhost:8080")
        log.Fatal(http.ListenAndServe(":8080", nil))
    }

:wq
Step 7: Run the go file from the root directory
go run main.go&
Step 8: Visit hosted site in browser
http://localhost:8080/
Step 9: Exit container without killing it
ctrl+p
ctrl+q
Lessons Learned:
- There are two ways to connect to a container 1. Podman exec bash 2. Podman attach
- Simple containers like the go Alpine image work on a single shell session
- exiting a container with 'exit' will not end will as it will signal to the shell session SIGTERM, this took a while to figure out. Burried in the documentation, was a graceful way of exiting, leaving jobs intact (ctrl+p, ctrl+q), this mimics the behavior of
Tmux where one detaches from a session while leaving it running. This convention was introduced by Docker.
Creating a more sophisticated container with podman-compose:
mkdir
vim podman-compose.yml
version: '3.9'
services:
:wq

podman-compose up -d

podman ps

podman attach to <name> or PID

ctrl+p

ctrl+q
Kubernetes
Intro
An open-source container orchestration platform designed to automate the deployment, scaling, and management of containerized applications. It provides a robust framework for running distributed systems resiliently, ensuring application uptime and ease of operation in a cloud-native environment. Kubernetes, often abbreviated as K8s, was inspired by Google’s internal system Borg, which managed and scheduled the company’s massive workloads across data centers worldwide. Created by Google engineers in 2014, Kubernetes was developed as an open-source project to enable developers to automate deployment, scaling, and management of containerized applications. With its robust orchestration capabilities, Kubernetes simplifies the complexities of managing containerized applications by automating processes like load balancing, storage management, and fault tolerance, making it a staple in cloud-native environments. Today, backed by the Cloud Native Computing Foundation (CNCF), Kubernetes continues to evolve with contributions from global tech communities, aiming to expand its reach in edge computing, hybrid cloud, and AI-driven orchestration.
Definitions
Pod
Kubernetes pods are the smallest and simplest unit in the Kubernetes object model, representing a single instance of a running process in a cluster. Each pod can contain one or more containers that share resources like networking and storage, enabling applications to run as isolated but cooperative components.
Node
A node is a physical or virtual machine in the Kubernetes cluster that runs pods. It contains the necessary services to manage networking between containers, monitor running containers, and communicate with the control plane.
Cluster
A Kubernetes cluster is a set of nodes grouped together to work as a single system. It includes a control plane and multiple nodes to run containerized applications efficiently.
Control Plane
The control plane manages the Kubernetes cluster. It is responsible for making global decisions about the cluster (e.g., scheduling), and it includes components such as the API server, scheduler, and etcd for cluster state storage.
Namespace
A namespace is a virtual cluster within a Kubernetes cluster. It is used to divide cluster resources among multiple users or teams, providing isolation and organization for resources.
Deployment
A deployment is a Kubernetes resource that defines the desired state of your application, such as the number of replicas to run. Kubernetes uses deployments to ensure your application is running as specified.
Service
A service in Kubernetes is an abstraction that defines a logical set of pods and a policy by which to access them. It enables stable networking for pods, even as they are replaced or restarted.
Ingress
Ingress is a Kubernetes object that manages external HTTP/S access to services within a cluster. It provides routing rules to map external traffic to internal services.
ReplicaSet
A ReplicaSet ensures a specified number of pod replicas are running at any given time. It replaces pods that are deleted or terminated to maintain the desired state.
ConfigMap
A ConfigMap is a Kubernetes object used to store configuration data in key-value pairs. It decouples application code from configuration, enabling easier updates.
Secret
A Secret is a Kubernetes object designed to store sensitive information like passwords, tokens, or keys. Secrets are base64-encoded for obfuscation and are mounted into pods securely.
PersistentVolume (PV)
A PersistentVolume is a piece of storage provisioned in a Kubernetes cluster, abstracting the underlying storage details. It is used for persisting data beyond the lifecycle of a pod.
PersistentVolumeClaim (PVC)
A PersistentVolumeClaim is a request for storage by a user. It enables pods to consume persistent storage resources provisioned as PersistentVolumes.
DaemonSet
A DaemonSet ensures that all (or some) nodes run a copy of a specified pod. It is commonly used for log collection, monitoring, or networking applications.
StatefulSet
A StatefulSet is a Kubernetes object designed for applications that require persistent identity and storage, such as databases. It ensures that pods have stable network identifiers and persistent storage.
Job
A job is a Kubernetes resource that runs a single task until completion. It is used for batch processing and ensures that the task completes successfully.
CronJob
A CronJob schedules jobs to run at specified intervals, similar to a cron scheduler in Unix/Linux systems.
Horizontal Pod Autoscaler (HPA)
The Horizontal Pod Autoscaler automatically adjusts the number of pods in a deployment, replica set, or stateful set based on observed CPU utilization or other custom metrics.
Custom Resource Definition (CRD)
A CRD allows users to define custom objects and resources to extend Kubernetes functionality beyond the default resources.
Volume
A volume in Kubernetes provides storage to a pod. Unlike container storage, volumes persist across container restarts and can share data among containers in the same pod.
Kubectl
kubectl is the command-line tool used to interact with a Kubernetes cluster, allowing users to deploy applications, inspect resources, and manage cluster components. It provides powerful commands to streamline Kubernetes operations, from creating pods to troubleshooting workloads.
Common Commands
List all namespaces
kubectl get namespaces
Get all pods in the current namespace
kubectl get pods
Get all resources in all namespaces
kubectl get all --all-namespaces
Describe a specific pod
kubectl describe pod <pod-name>
Create a resource from a YAML or JSON file
kubectl apply -f <file.yaml>
Delete a resource
kubectl delete <resource-type> <resource-name>
View pod logs
kubectl logs <pod-name>
Execute a command in a running pod
kubectl exec -it <pod-name> -- <command>
Scale a deployment
kubectl scale deployment <deployment-name> --replicas=<num-replicas>
Expose a deployment as a service
kubectl expose deployment <deployment-name> --type=<service-type> --port=<port>
View the status of nodes
kubectl get nodes
Get detailed information on services
kubectl get services
Set a context for a specific cluster
kubectl config set-context <context-name>
Switch to a different context
kubectl config use-context <context-name>
Port-forward a pod to your local machine
kubectl port-forward <pod-name> <local-port>:<remote-port>
View events int the cluster
kubectl get events
Apply changes interactively
kubectl edit <resource-type> <resource-name>
Roll back to a previous deployment version
kubectl rollout undo deployment/<deployment-name>
Get detailed information about a deployment
kubectl describe deployment <deployment-name>
Check the current context
kubectl config current-context
Certified Kubernetes Administrator
https://training.linuxfoundation.org/certification/certified-kubernetes-administrator-cka/
The CKA was created by the Linux Foundation and the Cloud Native Computing Foundation (CNCF) as a part of their ongoing effort to help develop the Kubernetes ecosystem. The exam is online, proctored, performance-based test that requires solving multiple tasks from a command line running Kubernetes.
Storage 🫙
- Understand storage classes, persistent volumes
- Understand volume mode, access modes and reclaim policies for volumes
- Understand persistent volume claims primitive
- Know how to configure applications with persistent storage
Troubleshooting 🤔
- Evaluate cluster and node logging
- Understand how to monitor applications
- Manage container stdout & stderr logs
- Troubleshoot application failure
- Troubleshoot cluster component failure
- Troubleshoot networking
Workloads & Scheduling ⚙️⏱️
- Understand deployments and how to perform rolling update and rollbacks
- Use ConfigMaps and Secrets to configure applications
- Know how to scale applications
- Understand the primitives used to create robust, self-healing, application deployments
- Understand how resource limits can affect Pod scheduling
- Awareness of manifest management and common templating tools
Cluster Architecture, Installation & Configuration 👷
- Manage role based access control (RBAC)
- Use Kubeadm to install a basic cluster
- Manage a highly-available Kubernetes cluster
- Provision underlying infrastructure to deploy a Kubernetes cluster
- Perform a version upgrade on a Kubernetes cluster using Kubeadm
- Implement etcd backup and restore
Services & Networking 🛜
- Understand host networking configuration on the cluster nodes
- Understand connectivity between Pods
- Understand ClusterIP, NodePort, LoadBalancer service types and endpoints
- Know how to use Ingress controllers and Ingress resources
- Know how to configure and use CoreDNS
- Choose an appropriate container network interface plugin
Study Plan
1. Goal
- Pass the CKA certification exam within 4 Months.
- Build hands-on expertise with Kubernetes clusters.
2. Timeline
- Duration: 16 weeks (can be adjusted based on your schedule).
- Daily Commitment: 2-3 hours/day.
- Weekly Breakdown:
- Focus on specific topics aligned with the CKA exam curriculum.
- Reserve time for labs, practice, and review.
3. Resources
- Books & Guides:
- Kubernetes Up & Running* by Kelsey Hightower.
- Official Kubernetes documentation: Kubernetes Docs
- Labs:
- Killercoda labs
- K3s on personal ProxMox lab
Study Notes
1. The Complexity of Kubernetes
- Kubernetes is often described as a vast “Rabbit Hole” 🕳️ with layers of concepts and tools. However, understanding why Kubernetes exists and how it works provides a solid foundation that will help immensely. 🚴
2. The Roots of Containerization
- The concept of CHROOT was one of the early steps toward what we now call containerization. 📦
- Containerization gained popularity with Docker, making it easy to package and deploy applications in isolated environments.
3. Containers on Virtual Machines: A Limitation
- Initially, containers would run within Virtual Machines (VMs), which limited their efficiency and scalability.
- Over time, as more VMs were needed to handle application loads, this setup led to increased complexity.
4. Managing VMs Before Kubernetes
- Before Kubernetes, Ansible was commonly used in multi-VM setups to handle deployments with a push-based workflow.
- However, this approach had a critical flaw:
- Lack of Communication: Each VM operated independently, with no real-time feedback between them.
- Sync Challenges: Keeping configurations synchronized across VMs was tedious, especially when maintenance was required on a single VM.
5. Enter Kubernetes: The Cloud Operating System
- Kubernetes was introduced to address these limitations and is often considered the operating system of the cloud.
- It allows a cluster of VMs (or nodes) to communicate and coordinate, enabling more efficient resource management and orchestration at scale.
K3s
K3s is a lightweight, easy-to-install Kubernetes distribution designed for simplicity and minimal resource usage, ideal for edge, IoT, and development environments. It’s great for getting started because it reduces complexity while providing the full Kubernetes experience, making it perfect for learning and small-scale deployments.
Install K3S
Source of installl script https://docs.k3s.io/quick-start
Install Script
curl -sfL https://get.k3s.io | sh -
Change permissions
sudo chmod 644 /etc/rancher/k3s/k3s.yaml
Configure KUBECONFIG for the non root user
This is needed as once k3s restarts, permissions are lost. One must create persistent permissions.
mkdir -p ~/.kube

sudo cp /etc/rancher/k3s/k3s.yaml ~/.kube/config

echo 'export KUBECONFIG=~/.kube/config' >> ~/.bashrc

source ~/.bashrc

sudo chown $(id -u):$(id -g) ~/.kube/config
Create alias for kubectl to save typing echo 'alias k=kubectl' >> ~/.bashrc
Connect 'k' alias to 'kubectl' auto complete complete -o default -F __start_kubectl k
Send Kubectl Tab Completion to .bashrc echo "source <(kubectl completion bash)" >> ~/.bashrc
Restart config source ~/.bashrc
When shit hits the fan Attach to the container kubectl exec -it dev-pod -c dev-container -- /bin/bash
Talos
Talos is an interesting Distribution specifically dedicated to Kubernetes. Reduced to only essential components, talos is only utilizing the Linux Kernel and Several Go Binaries. It lacks traditional components like SSH, Systemd, glibc, package manager, or shell. It is secure by default with PKI and API-Driven operations. Management is done via YAML manifests or talosctl, a CLI tool.
Main Features of Talos
-
Immutable: Talos Linux is designed to be immutable, meaning its filesystem is read-only. This prevents unintended changes and enhances system reliability and security.
-
Ephemeral: Talos can be configured to run in an ephemeral mode, where state is not persisted across reboots. This is ideal for stateless systems or environments requiring rapid recovery or scaling.
-
Secure: Talos emphasizes security by default. It operates with minimal attack surface, includes features like encrypted communications, and removes unnecessary tools such as SSH, further reducing vulnerabilities.
Common talosctl Commands
General Node Management
View Node Information
talosctl get nodes
Bootstrap a Node
talosctl bootstrap
Reboot a Node
talosctl reboot
Shutdown a Node
talosctl shutdown
Drain a Node
talosctl drain <node-name>
Fetch Node Configuration
talosctl read /config
Apply Configuration
talosctl apply-config --insecure --nodes <IP> --file controlplane.yaml
List Node Services
talosctl service list
Get Service Details
talosctl service <service-name>
Restart a Service
talosctl service restart <service-name>
Kubernetes Cluster Management
Get Kubernetes Cluster Info
talosctl cluster info
Fetch Kubeconfig
talosctl kubeconfig
Reset Kubernetes State
talosctl reset --graceful
Upgrade Kubernetes Version
talosctl upgrade-k8s --to <version>
Debugging and Diagnostics
Fetch Logs
talosctl logs <service-name>
Run Command on a Node
talosctl exec <command>
Display Node Environment
talosctl environment
Inspect Node Health
talosctl health
Fetch Crash Dumps
talosctl debug gather
Configuration Management
Generate Cluster Configuration
talosctl gen config <cluster-name> <https://control-plane-ip>:6443
Validate Configuration
talosctl validate config <file.yaml>
Edit Node Configuration
talosctl edit config
View Current Configuration
talosctl config show
Utility Commands
Switch Contexts
talosctl config endpoint <control-plane-ip>
Set Context Settings
talosctl config endpoint <ip>
talosctl config node <ip>
talosctl config auth <cert-file> <key-file>
Check Node Version
talosctl version
Display Help
talosctl help
Embedded Hardware
Embedded hardware refers to specialized computing devices designed to perform specific tasks within a larger system. Unlike general-purpose computers like desktops or laptops, embedded systems are typically “hidden” inside products, quietly controlling their functionality. They are found everywhere—from washing machines and smart thermostats to cars, medical devices, and industrial machinery.
Embedded systems are built around microcontrollers or microprocessors, which are compact, low-power computers integrated with memory, input/output (I/O) interfaces, and sometimes peripherals. These devices run software that directly interacts with the hardware to control sensors, motors, displays, and communication modules.
Embedded ≠ Software Engineering
1. Constraints
Embedded systems operate within strict hardware limitations, including limited memory, processing power, and energy consumption. Developers must write highly efficient code to make the most of the available resources, unlike standard software engineering where systems often run on powerful, resource-rich computers.
2. Real-Time Requirements
Many embedded systems have real-time constraints, meaning they must respond to inputs or perform tasks within strict timing windows. For example, an airbag controller in a car must deploy in milliseconds during a collision. These timing guarantees are less common in general-purpose software development.
3. Direct Hardware Interaction
Embedded development often involves low-level programming, interacting directly with hardware registers and peripherals. This contrasts with traditional software engineering, where high-level abstractions are used, and developers rarely need to interact with hardware directly.
4. Platform-Specific Development
While general-purpose software development focuses on portability across operating systems (Windows, macOS, Linux), embedded systems are tightly coupled to specific hardware platforms, such as ARM Cortex-M or RISC-V microcontrollers. Developers must tailor their code to the target platform, often using specialized tools and libraries.
5. Absence of Standard Libraries 🛑
Many embedded environments do not support standard libraries or operating systems. Developers often work in a “bare-metal” environment, managing tasks like memory allocation and concurrency manually.
6. Debugging Challenges
Debugging embedded systems requires specialized tools such as in-circuit debuggers (ICDs) or JTAG interfaces, as developers can’t simply print debug logs to a console like in traditional software. Observing and analyzing hardware behavior is crucial in embedded development.
7. Longer Product Lifecycles
Embedded systems often have much longer lifecycles compared to standard software. For example, an industrial machine controller might need to remain functional and maintainable for decades, whereas software for general-purpose computers is updated or replaced more frequently.
Rust for Embedded Hardware 🦀
Firstly Rust on Embedded is a different beast as the standard library is not used and memory safety is not on by default. However, there are still some advantages over a popular language like C or C++. HAL or Hardware Abstraction Layer separates the hardware from the code enabling more portable software that can compile to multiple architectures. Cargo improves development ergonomic by creating and managing the project and its dependancies. Thirdly, the build system is unified across platforms, so code will compile on Windows, Mac and Linux in the same way. Rust on embedded systems is a different challenge, as it does not use the standard library, and memory safety is not enabled by default. However, it still offers several advantages over popular languages like C or C++. One key benefit is the Hardware Abstraction Layer (HAL), which separates hardware-specific details from the code, enabling more portable software that can compile across multiple architectures. Additionally, Cargo enhances development ergonomics by simplifying project and dependency management. Lastly, Rust’s unified build system ensures consistent behavior across platforms, allowing code to compile seamlessly on Windows, macOS, and Linux.
HAL 🪢
Is really interesting, it is the concept of mapping hardware and storing the map for API access. HAL leverages Peripheral Access Crates (PACs), which are auto-generated Rust crates representing the registers and bitfields of a microcontroller. PACs allow safe and direct access to hardware registers while ensuring Rust’s strict type-checking and ownership rules are followed. HAL sits on top of PACs, abstracting these low-level details. Rust embedded HALs adhere to the embedded-hal traits—a collection of interfaces defining common operations like GPIO pin control, SPI/I2C communication, timers, and ADC usage. By implementing these traits, HAL provides a uniform way to interact with hardware, regardless of the underlying platform. HAL abstracts device-specific features into a user-friendly API. For example: • Configuring a GPIO pin involves selecting its mode (input, output, pull-up, etc.) without directly modifying hardware registers. • Communication protocols like SPI or I2C are exposed through easy-to-use Rust methods (read, write, transfer, etc.).
Cargo 📦
Cargo handles dependencies seamlessly using Cargo.toml. Developers specify libraries (called “crates”) with version constraints, and Cargo fetches and builds them automatically. Cargo:
- Ensures reproducible builds by generating a Cargo.lock file that locks dependency versions.
- Community-driven ecosystem (e.g., crates.io) simplifies finding and using high-quality, maintained libraries.
Managing Dependancies ⚙️ with Cargo.toml
[dependencies]
embedded-hal = "0.2.6"
stm32f4xx-hal = "0.14"
Cross-compilation support is integrated via targets 🎯
cargo build --target thumbv7em-none-eabihf
Enforced project Structure 👮♂️
my_project/
├── Cargo.toml       # Dependencies & configuration
└── src/
    └── main.rs      # Application entry point
Cross Platform 💻 💼
- Tools like probe-rs allow seamless debugging and flashing of embedded devices on multiple platforms (Linux, macOS, Windows).
- The cargo ecosystem integrates testing, building, and dependency management across platforms without additional tools.